Dahua Support
DMSS Setup
Set Up New Phone
Download and Install the DMSS App
Step 1: Download the DMSS App
For Android Users:
Visit the Google Play Store.
Search for the DMSS app.
Tap Install next to the app listing.
For iPhone Users:
Go to the Apple App Store.
Look up the DMSS app.
Press Install to begin the download.
Step 2: Install the App
After the download is complete, the app should automatically begin the installation process on your device.
Step 3: Open the App and Set Up
Open the DMSS app once it is installed.
Follow the on-screen instructions to complete the setup.
Use the Custom QR Code
Step 1: Access the Add Camera Feature
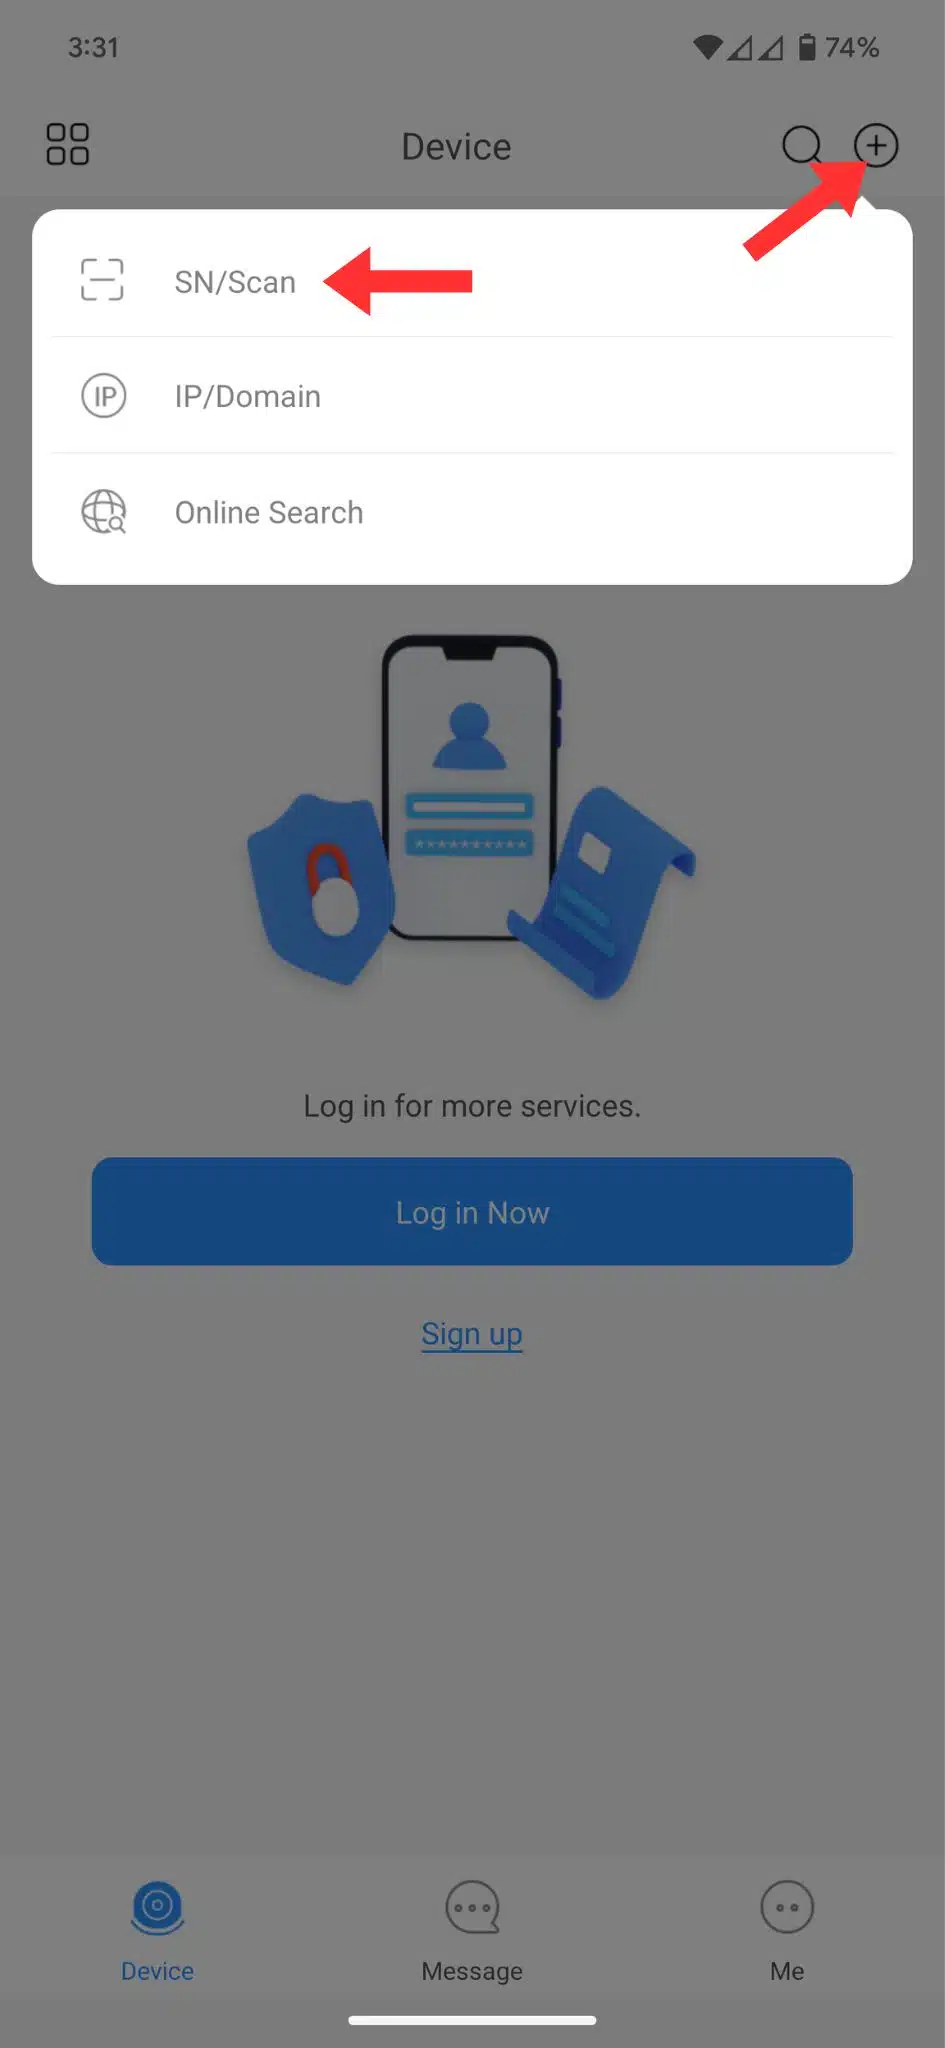
Select the “+” icon located at the top right corner of the interface, then choose “SN/Scan”.
Step 2: Scan the Installation QR Code
Scan the QR code provided to you on the day of installation, this would have been provided for you on the back of our business card.
Upon completing these steps, your camera(s) will be added to your system.
Use the QR Code on the bottom of the NVR
Step 1: Find Your QR Code
If you have misplaced the QR code, do not worry. You can still locate a QR code on the bottom of the NVR (Network Video Recorder).
Step 2: Scan the QR Code
Use your device to scan the QR code. This can be found on the bottom of the NVR.
Step 3: Enter Account Details After scanning the QR code, you will need to enter the following details for setup:
Alias: Enter “Home”.
Username: Enter “admin” (Please note: This is case sensitive).
Password: Enter “Hifiguy123!!” (This is also case sensitive).
Completing these details will finalize your setup.
Create a QR Code on an Existing Device
Step 1: Create a QR Code on the Existing Device
Open the App: Start by launching the DMSS app on the device where the cameras are already installed.
Export Device Settings:
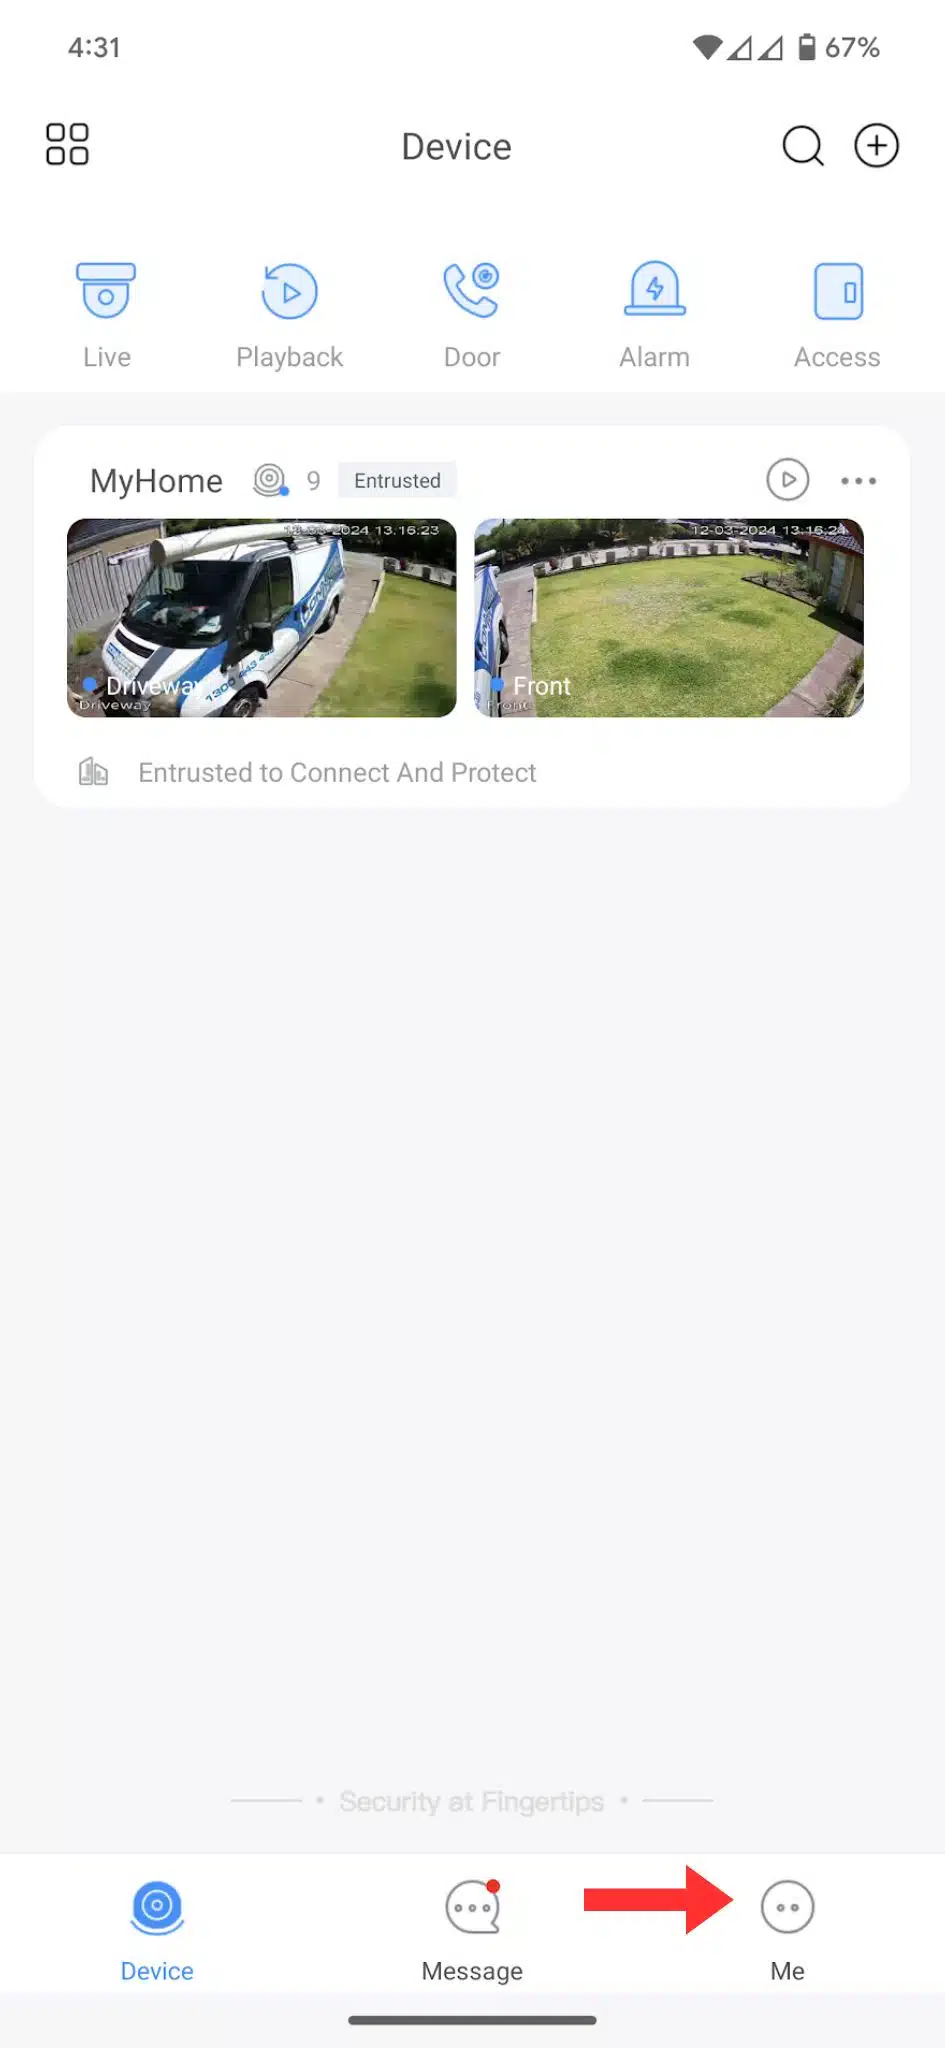
Navigate to the “Me” section.
Select “Export Device.”
Choose the device you wish to transfer, typically named “Home.”
Generate a Device Card:
Select “Create a Device Card.”
When asked if you want to create a password, choose “No.”
Step 2: Transfer to a New Device by Scanning the QR Code
Scan the QR Code: Use the new device to scan the QR code generated by the existing device.
By following these steps, your camera setup will be transferred to your new device without the need to manually enter the details.
Set Up Notifications
Step 1: Access Device Settings
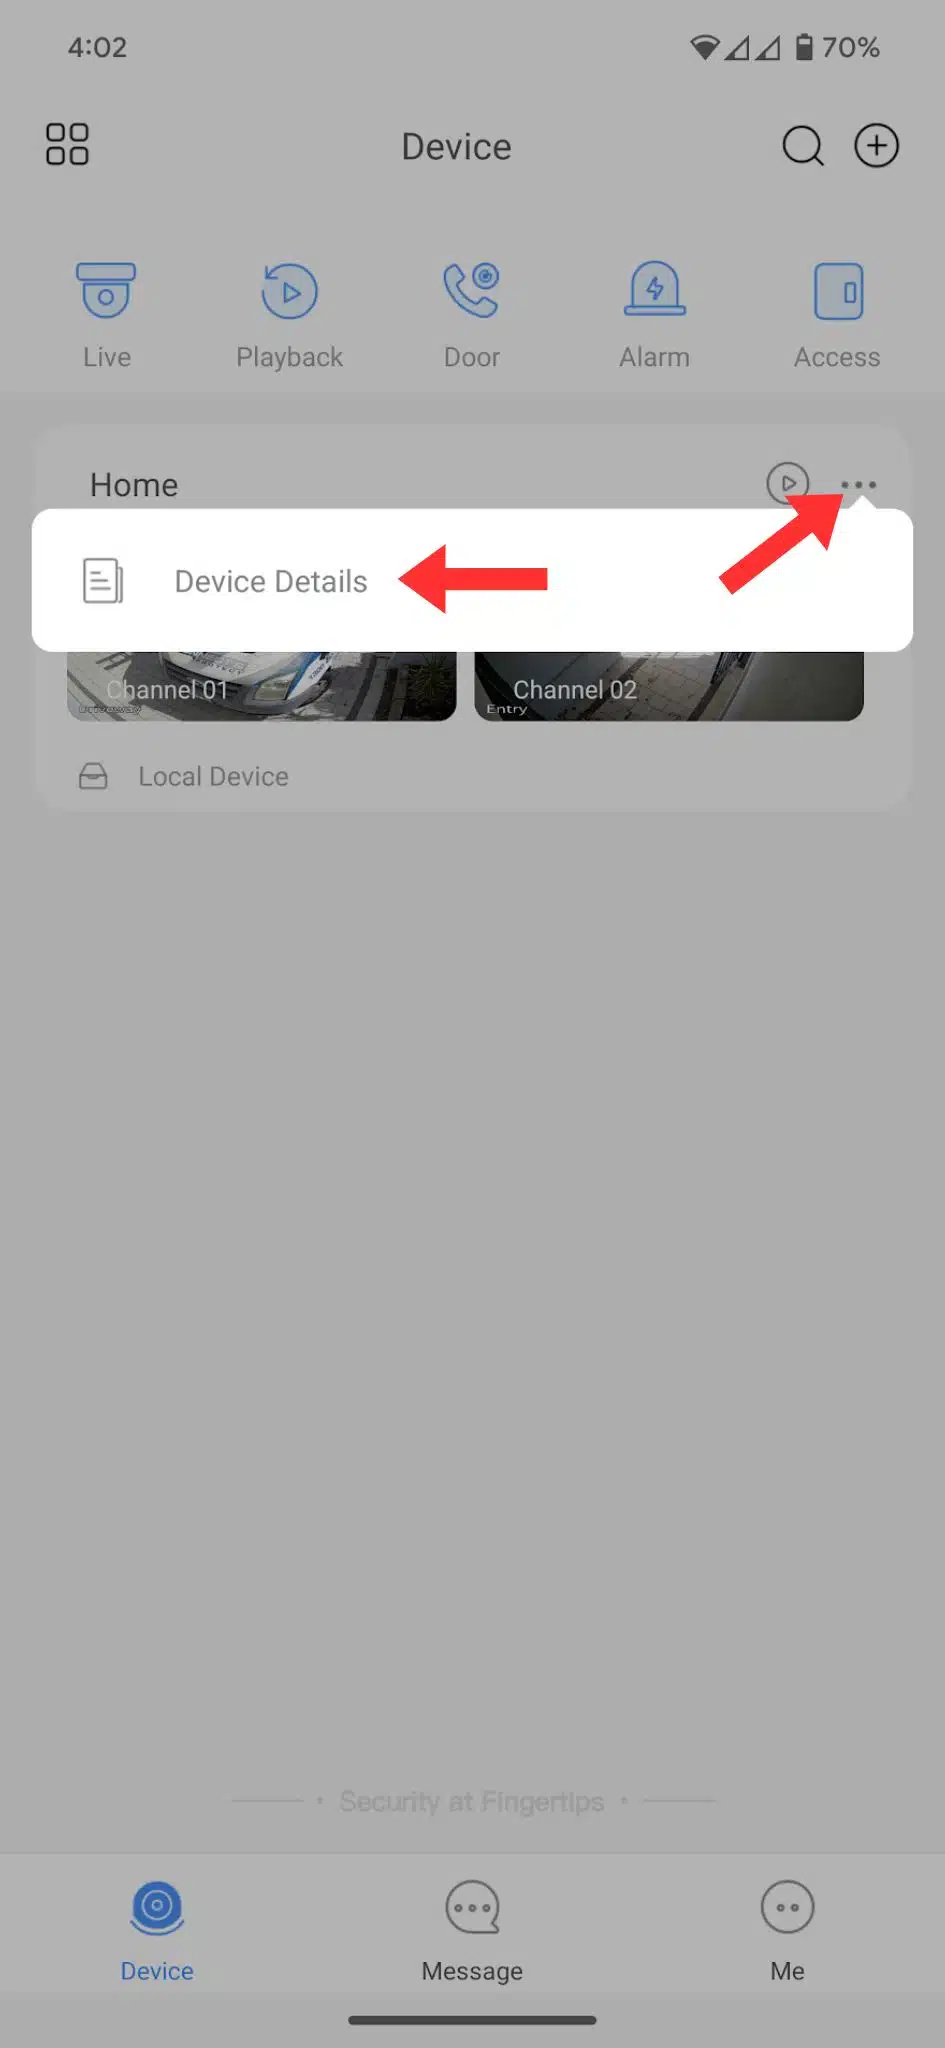
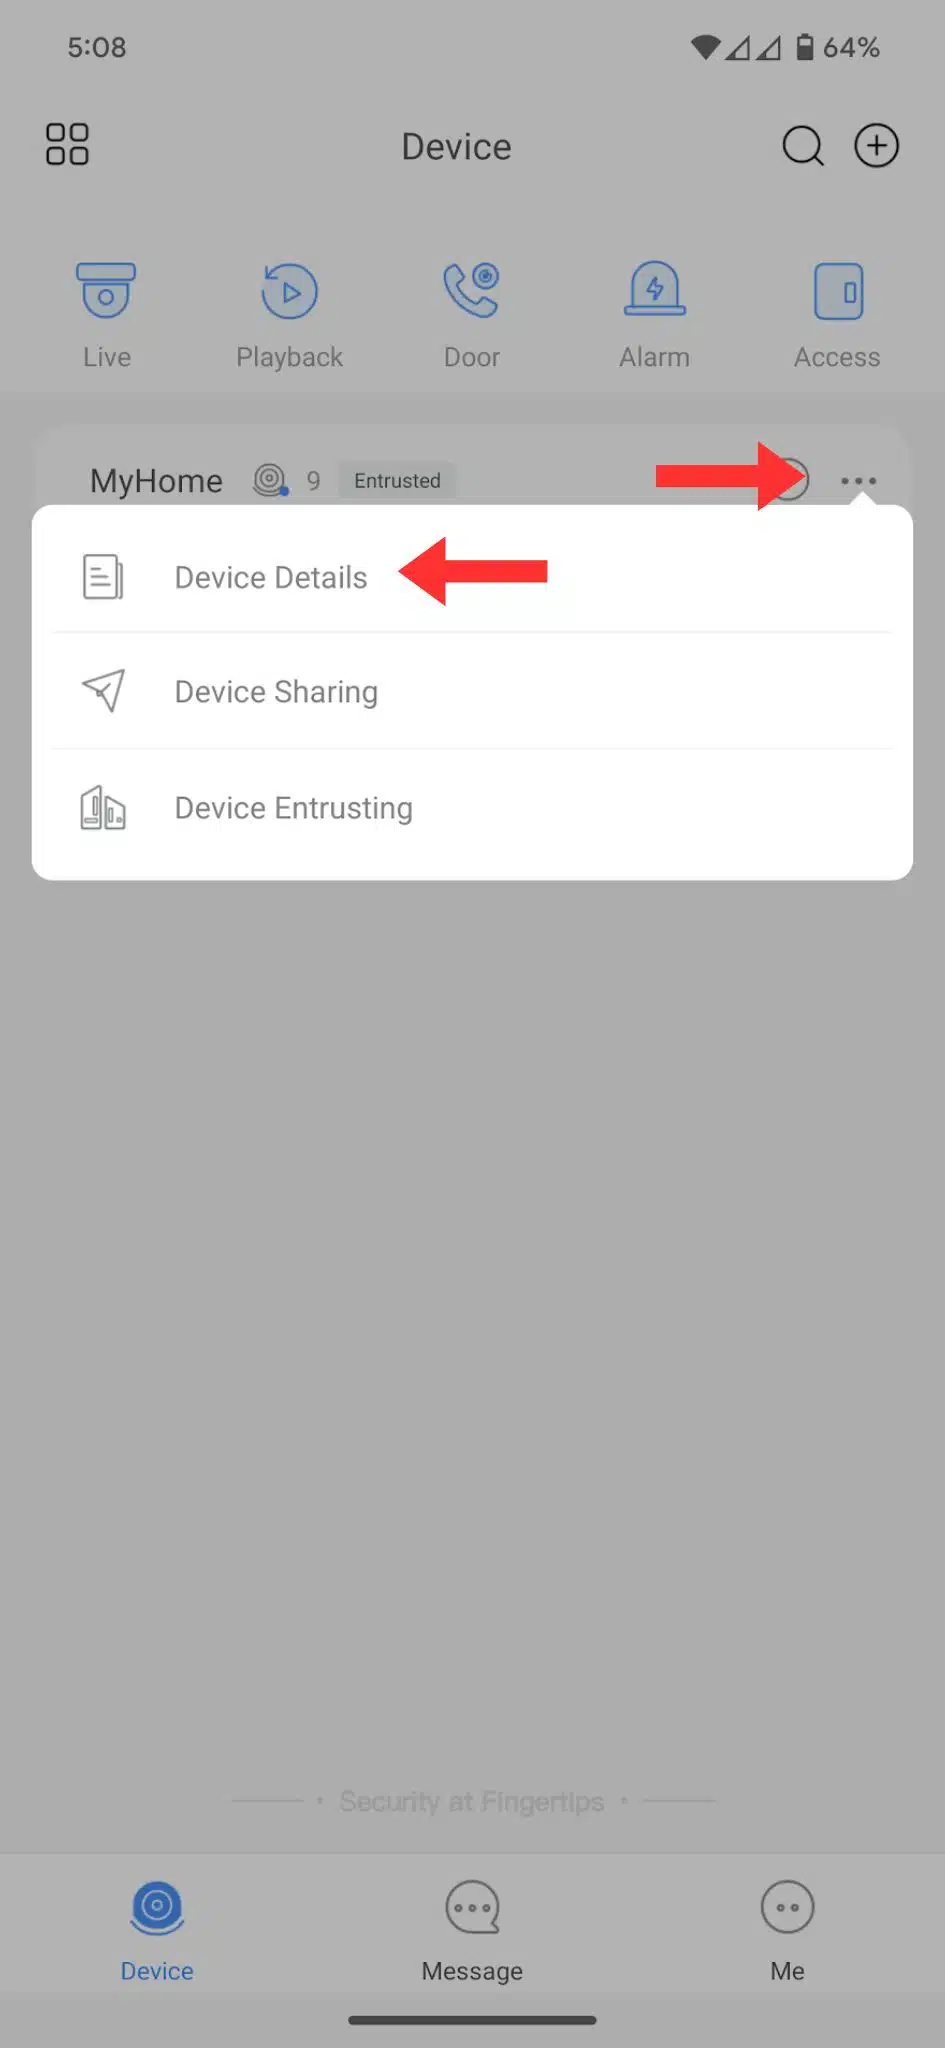
Start by tapping the Three dots to open the menu.
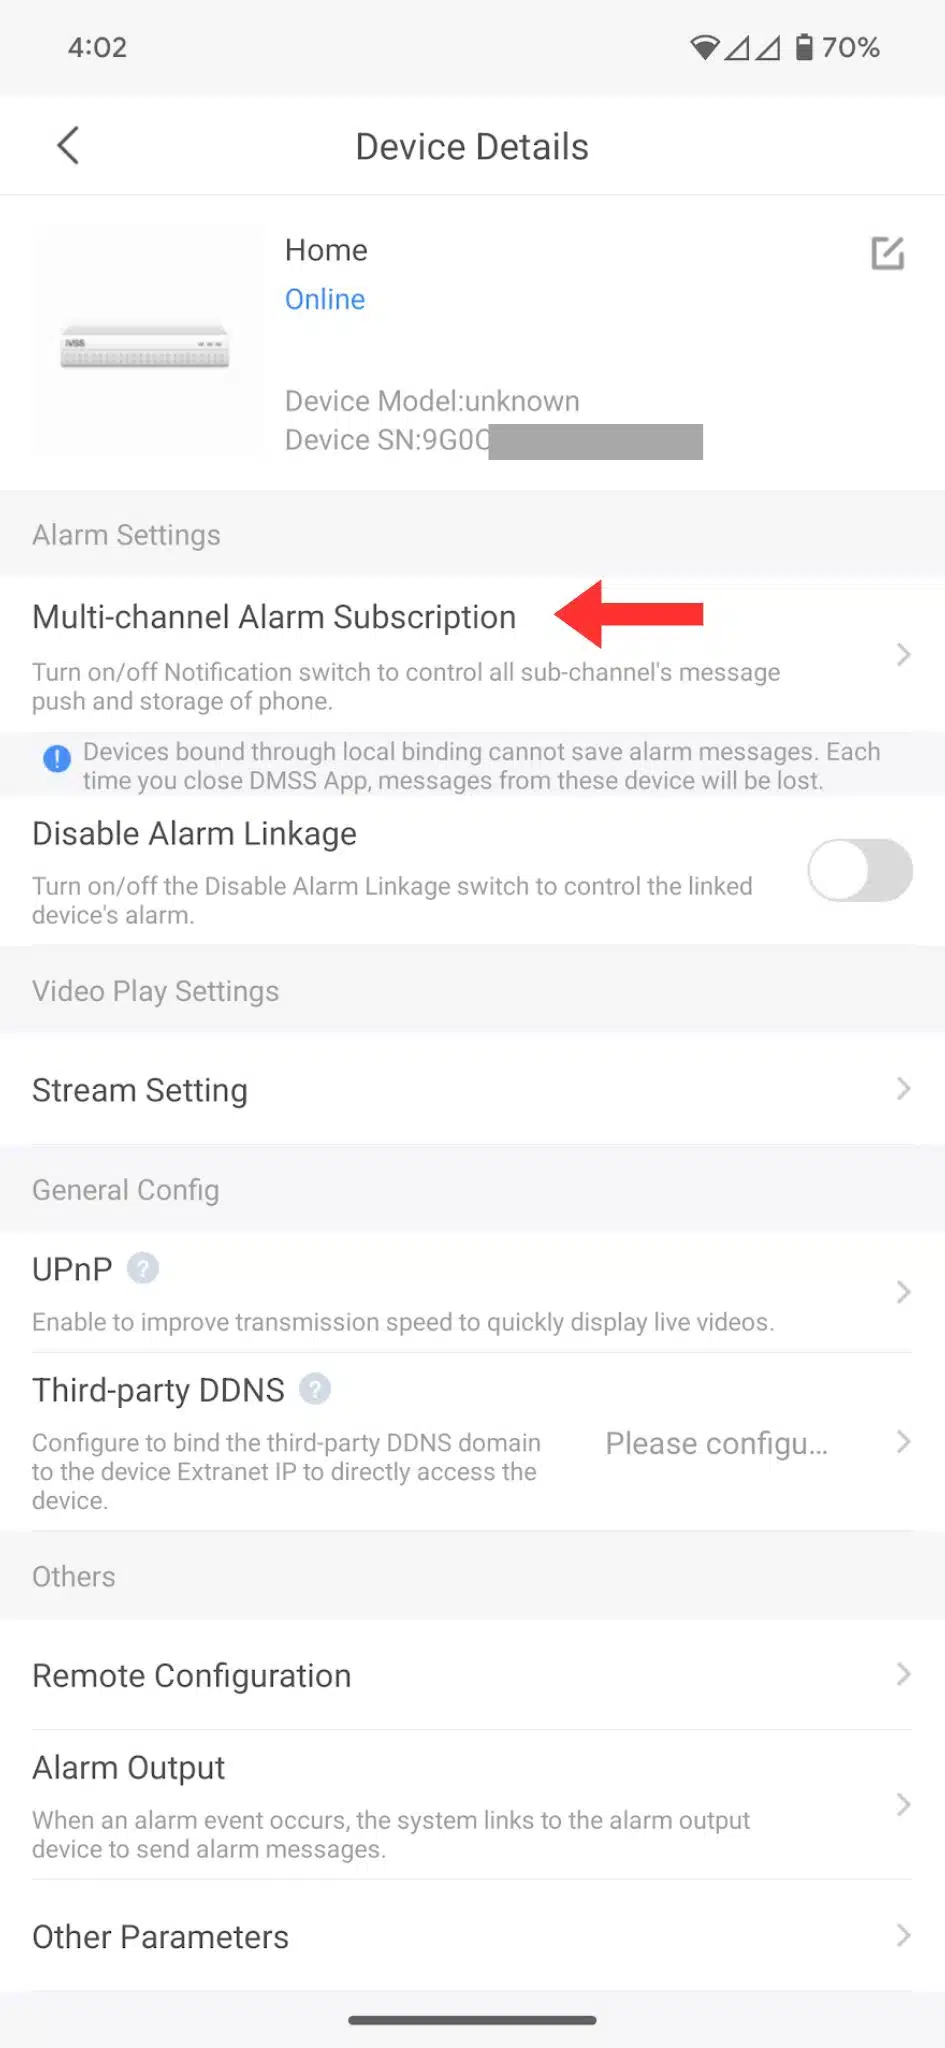
Proceed to Device Details.
Step 2: Subscribe to Multi-Channel Alarm
Select Multi-channel alarm subscription.
Step 3: Activate Notifications
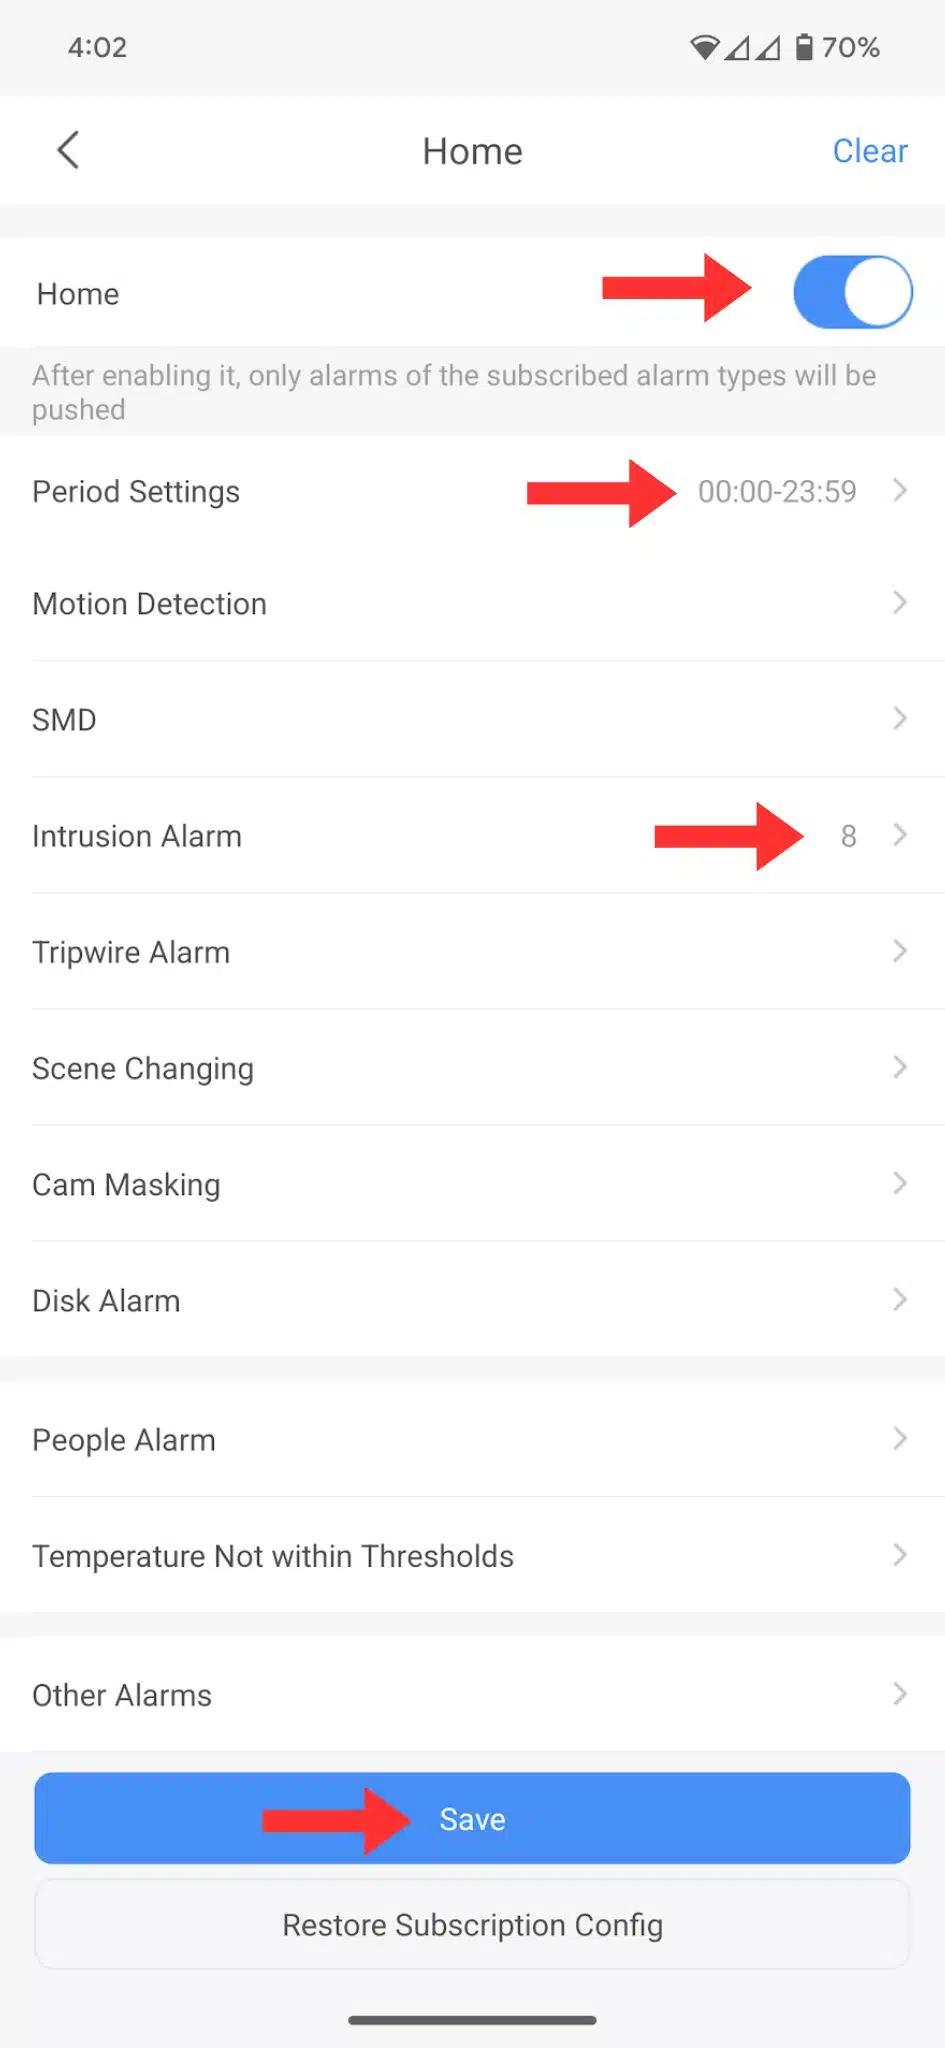
Turn on notifications using the slider button.
Step 4: Configure Intrusion Alarm
Choose Intrusion Alarm.
Select Select all to activate alarms for all channels.
Step 5: Save Your Settings
Navigate back by pressing Back.
Confirm your changes by hitting Save.
By following these steps, you’ll have successfully set up notifications for intrusion alarms across all channels.
DMSS Features
Live View
Step 1: Start Playback
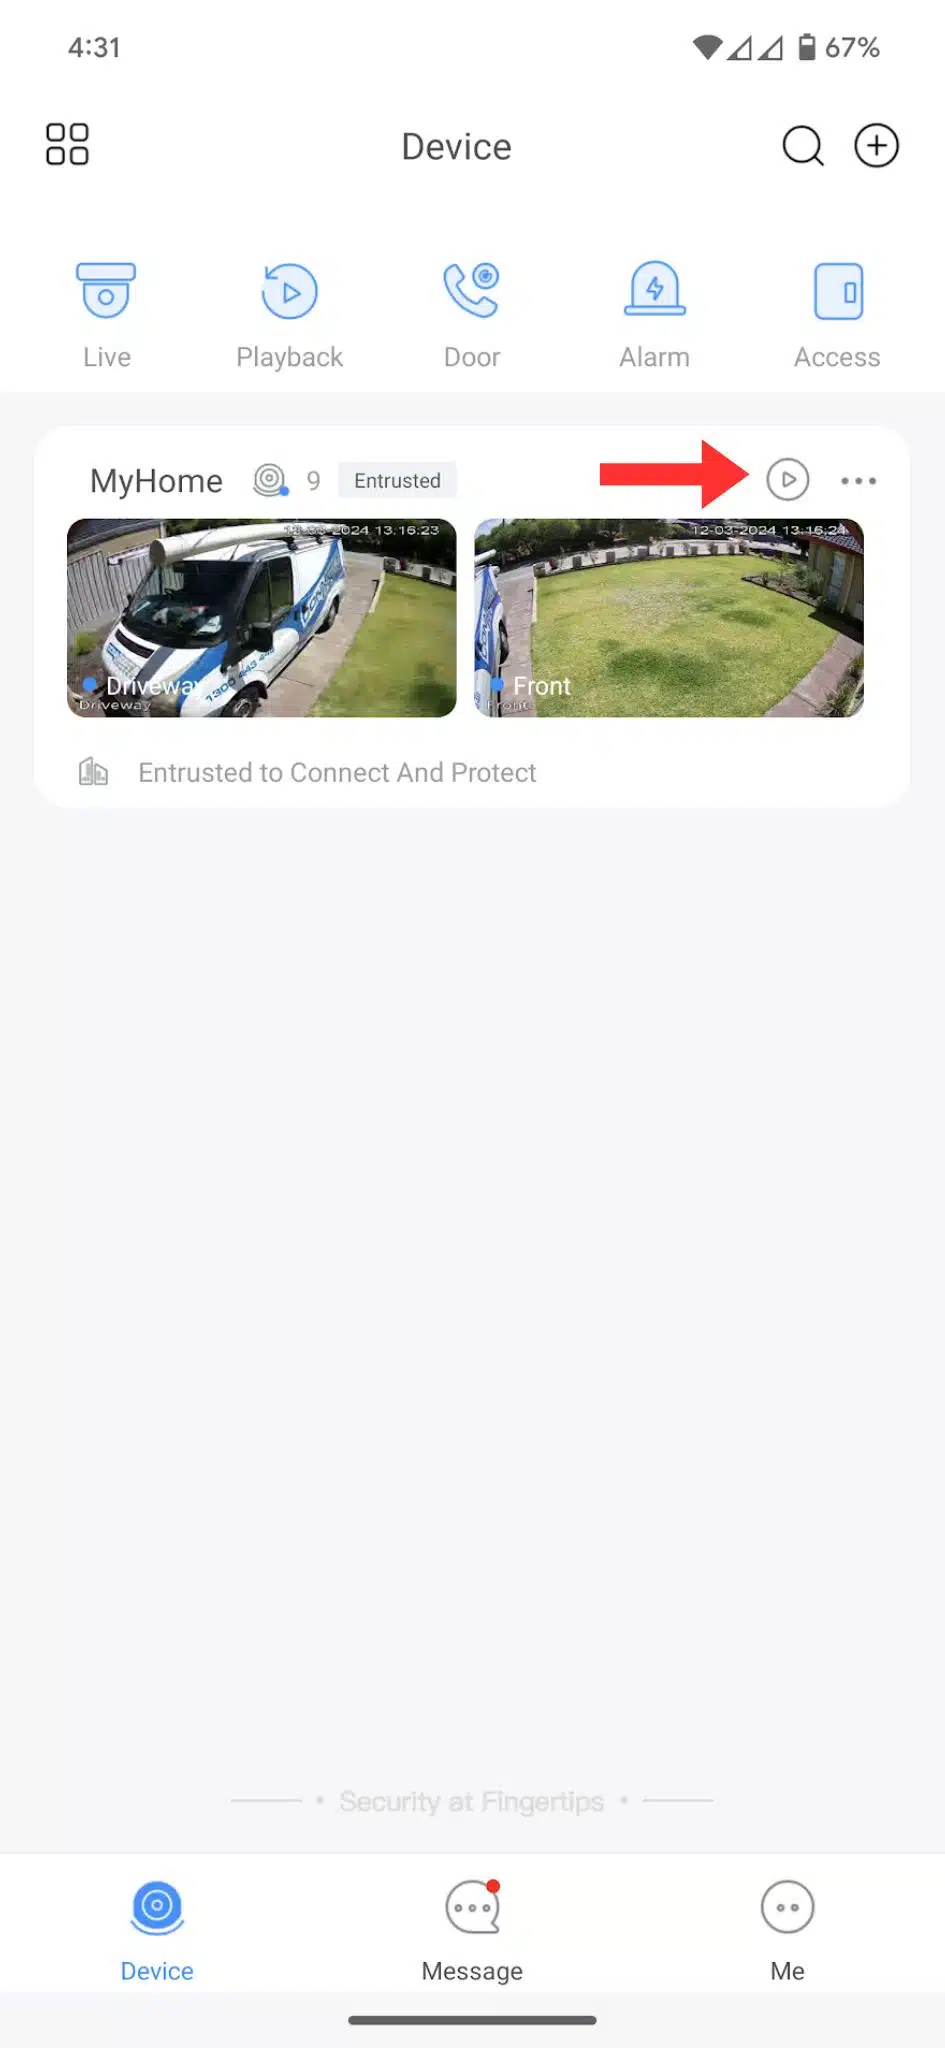
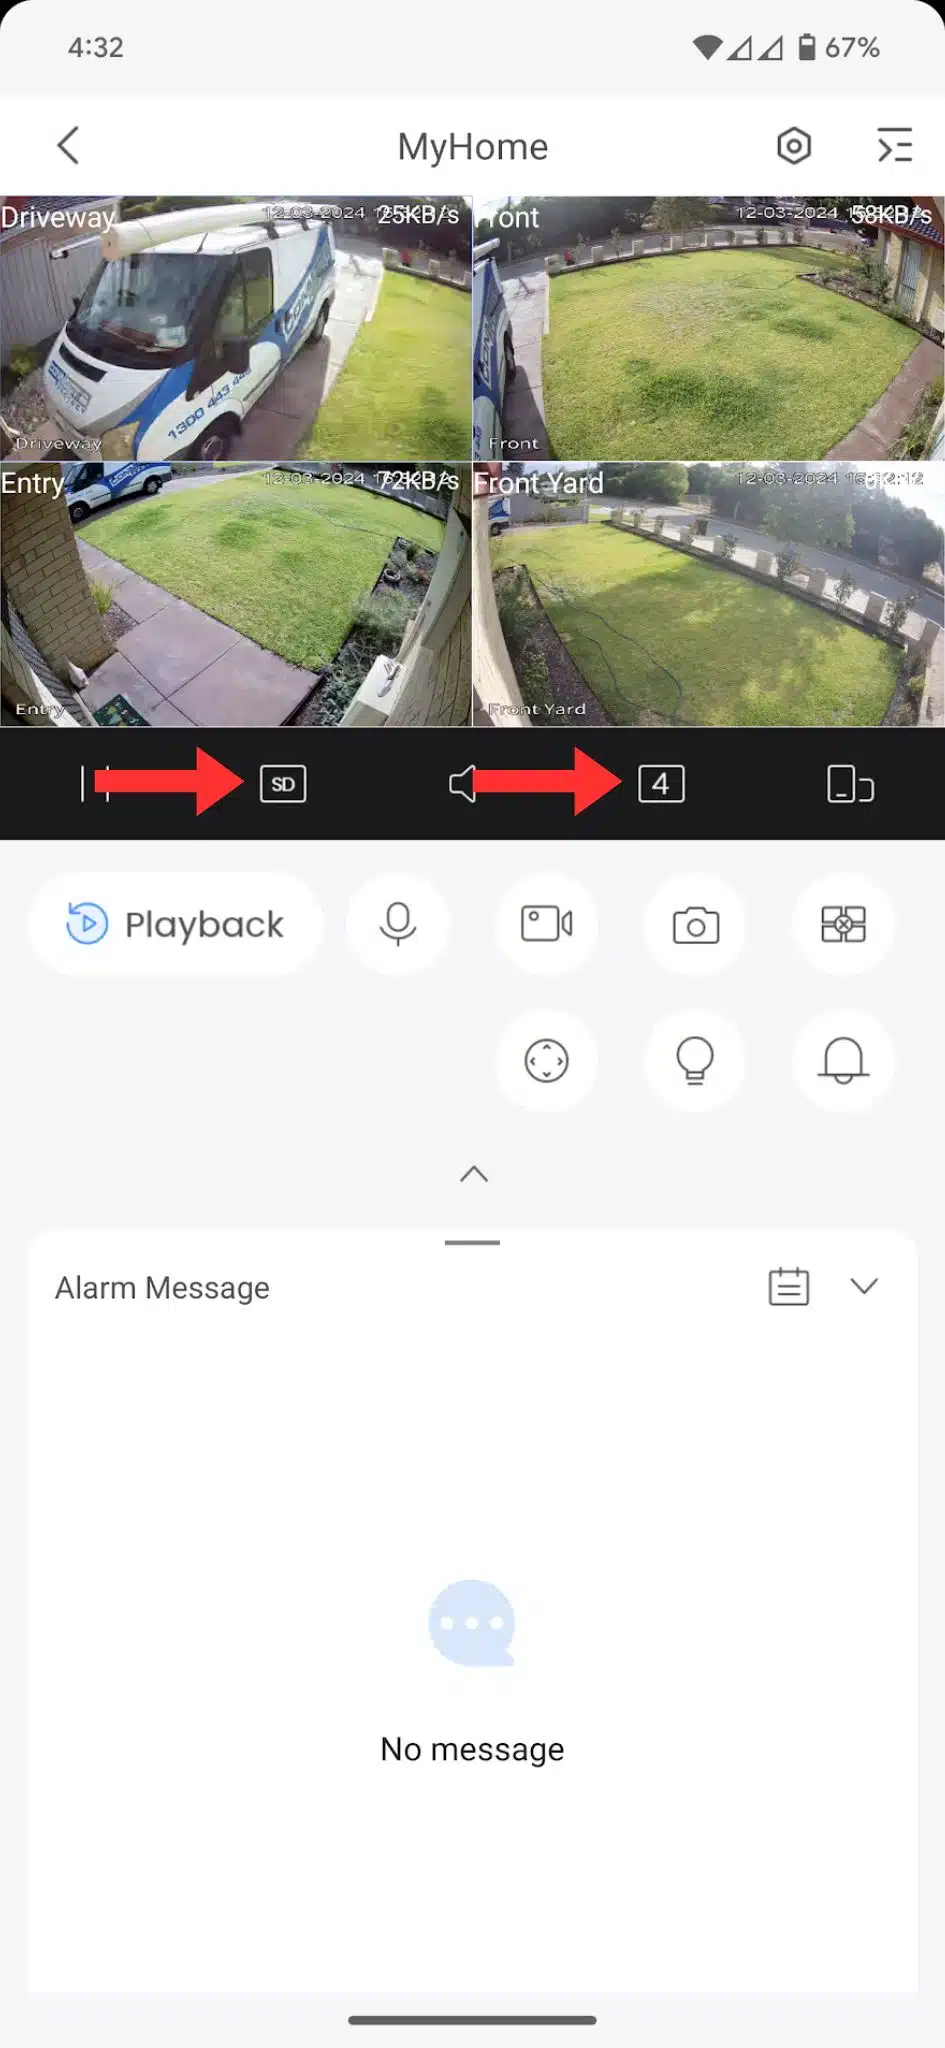
Click the Play Button surrounded by a circle to begin viewing the live feed.
Step 2: View Multiple Cameras
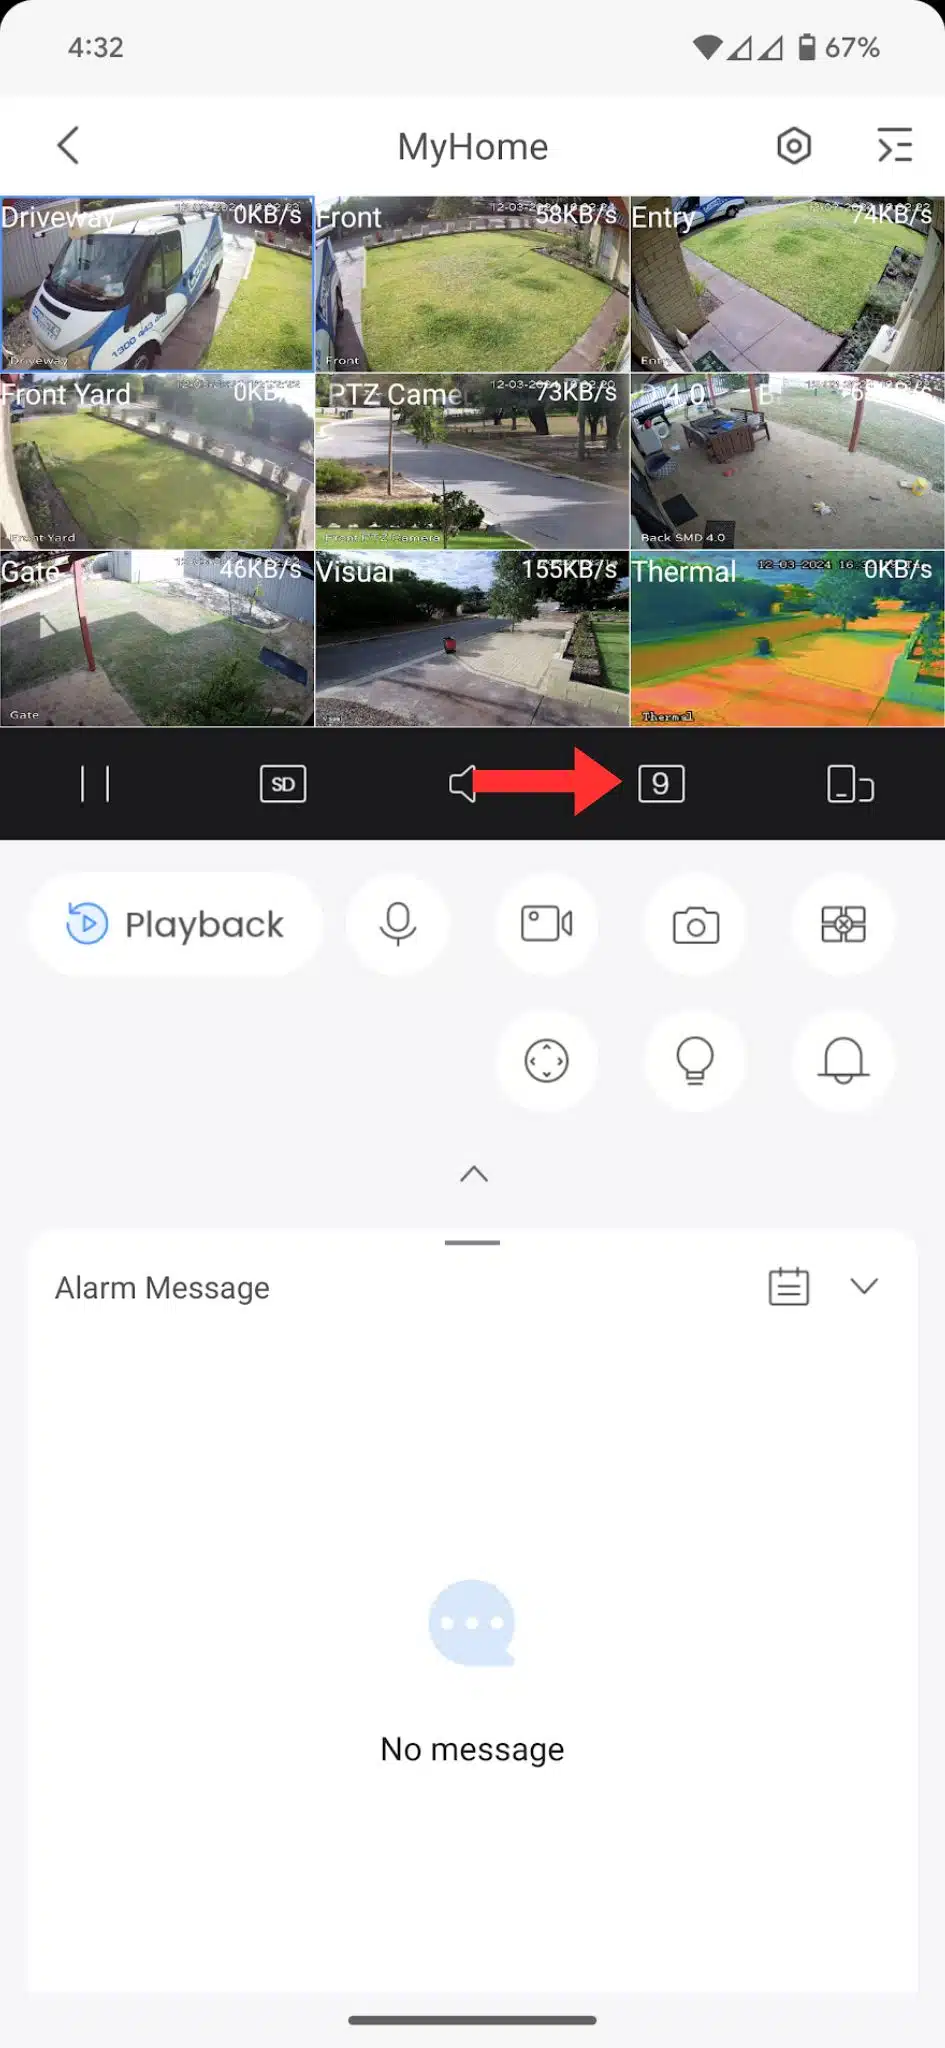
To playback more cameras simultaneously, select the icon with 4 in the square.
Step 3: Upgrade Feed Quality
Click the SD button to switch the feed from standard definition (SD) to high definition (HD). Note that changing this setting will not affect the recording quality.
Playback Videos
Step 1: Access Playback Feature
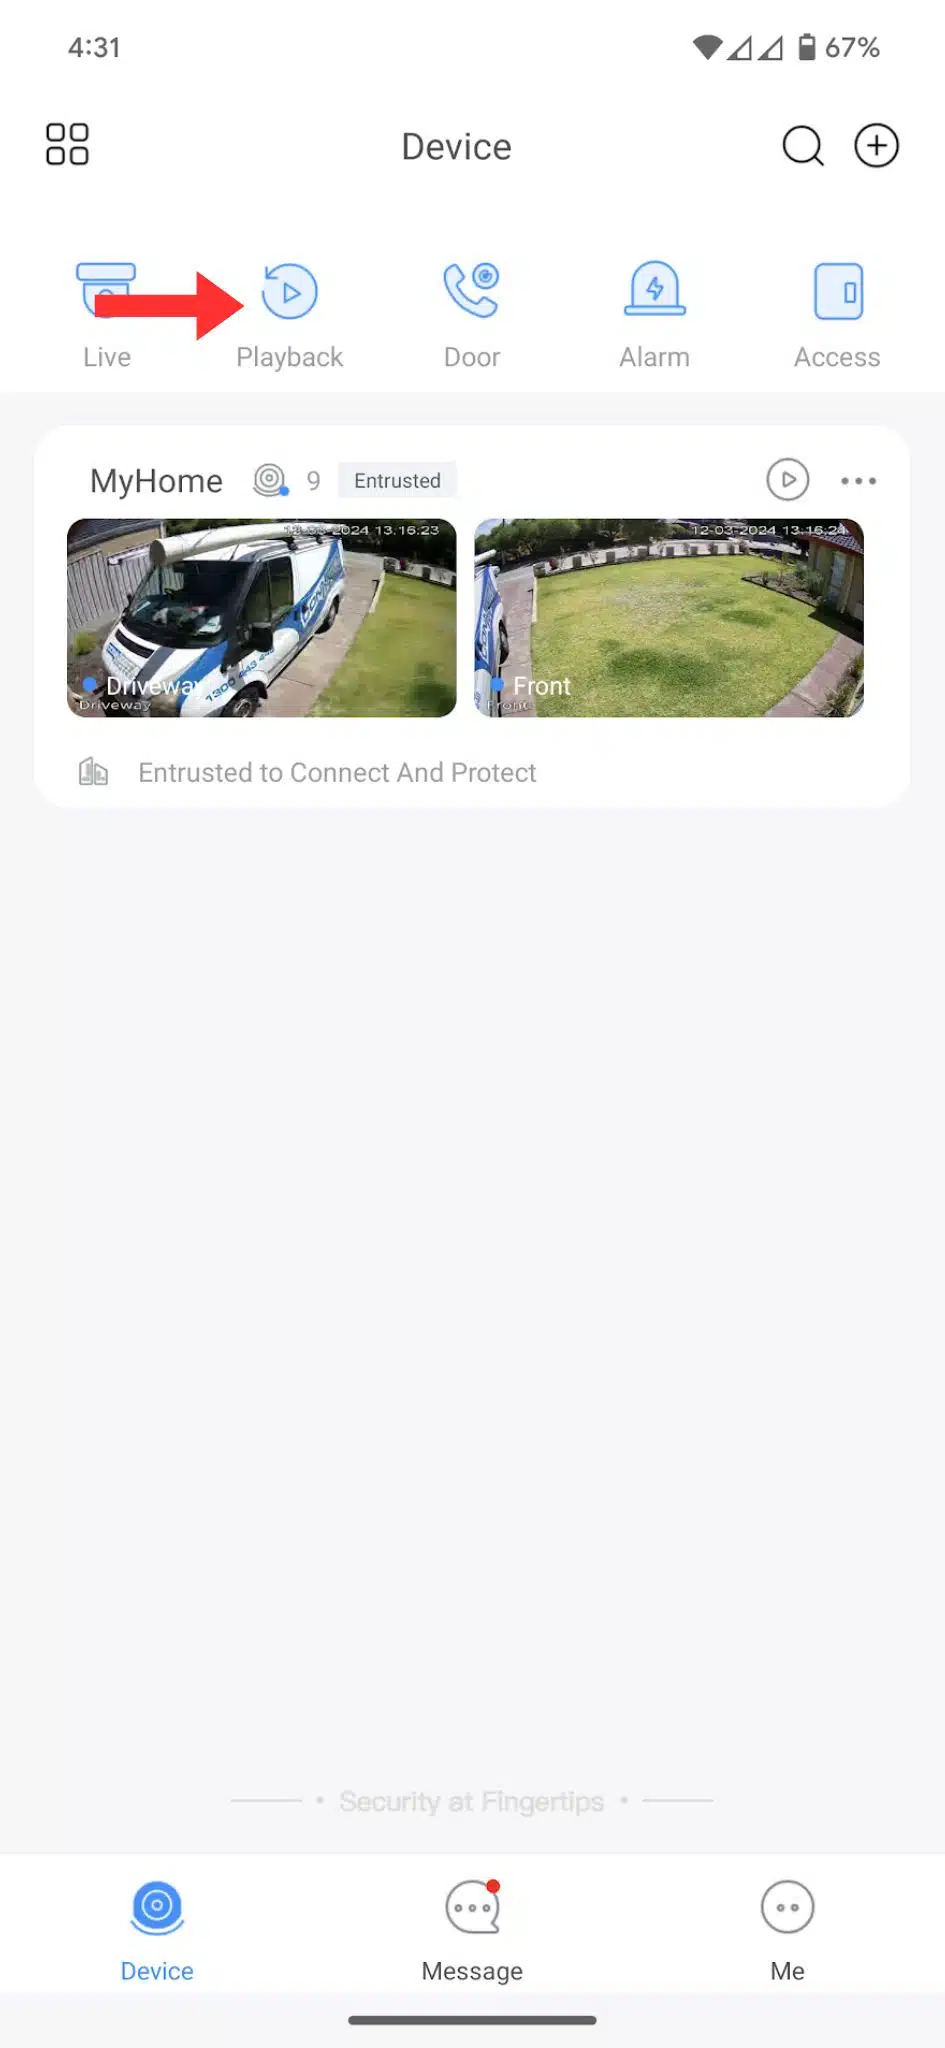
Begin by selecting Playback from the menu.
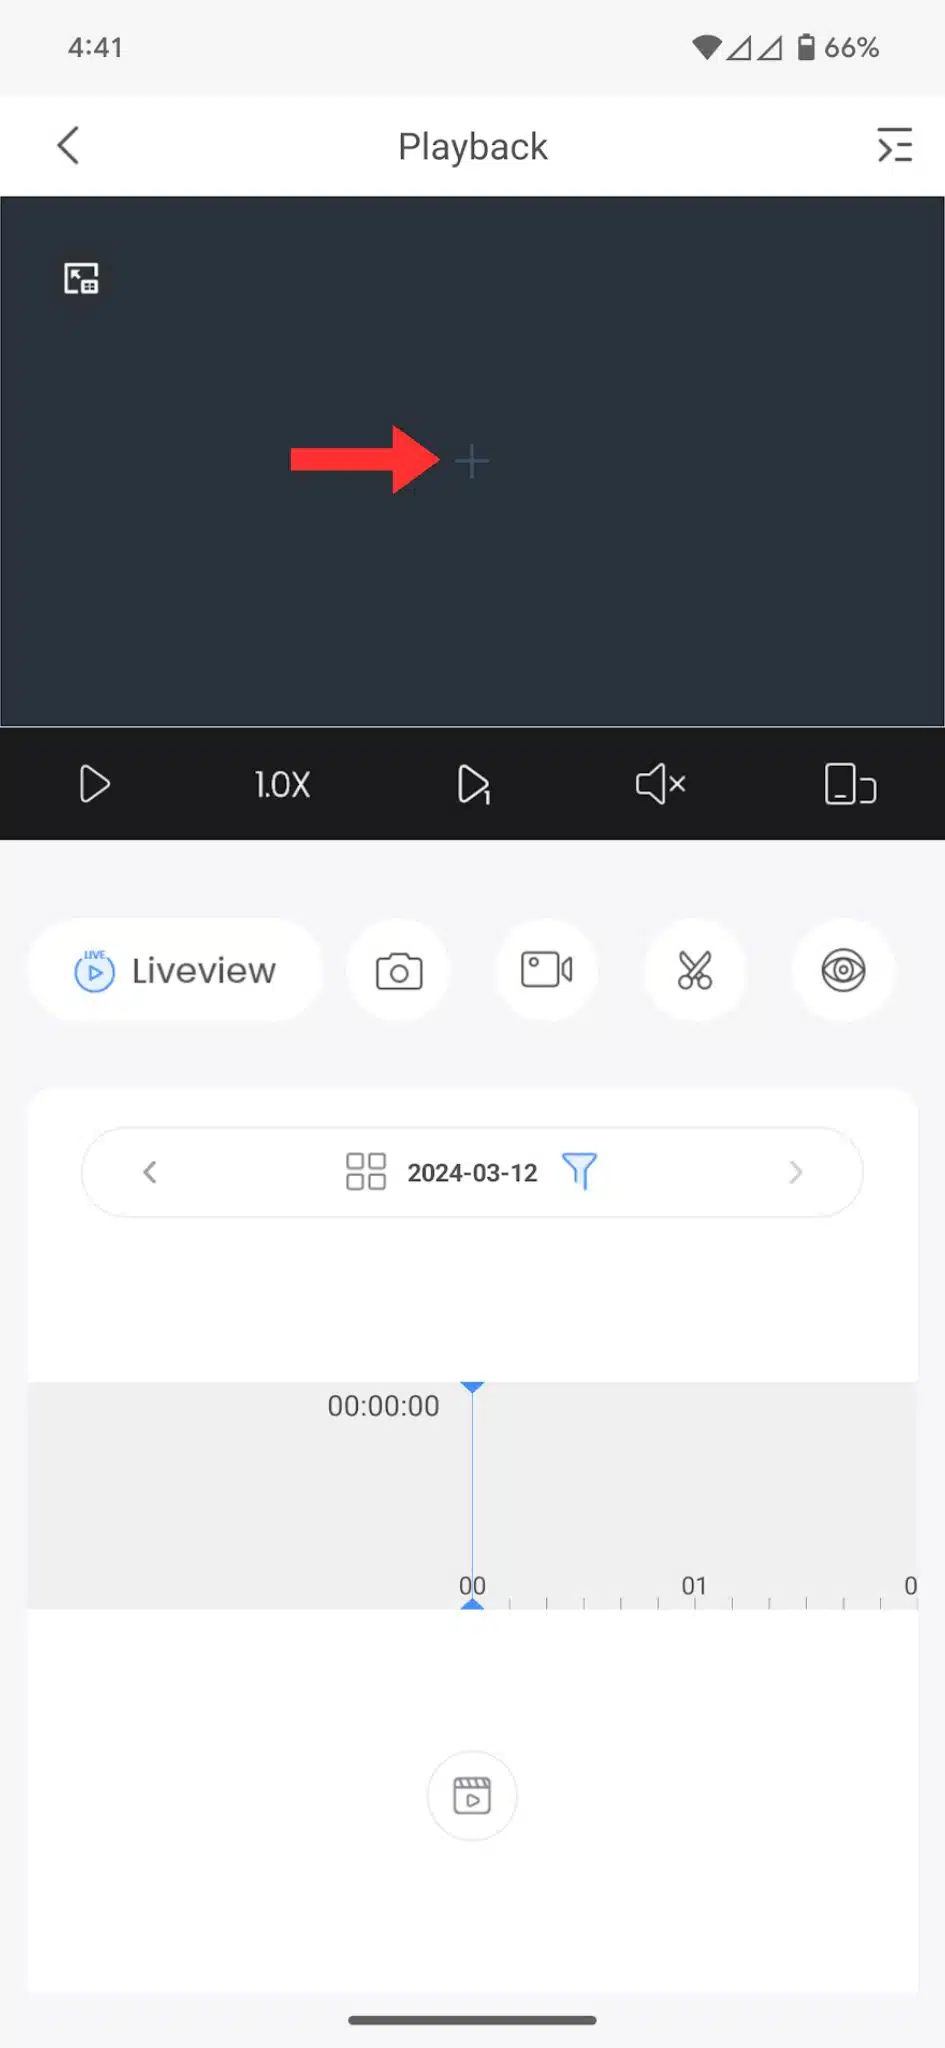
Step 2: Add Cameras
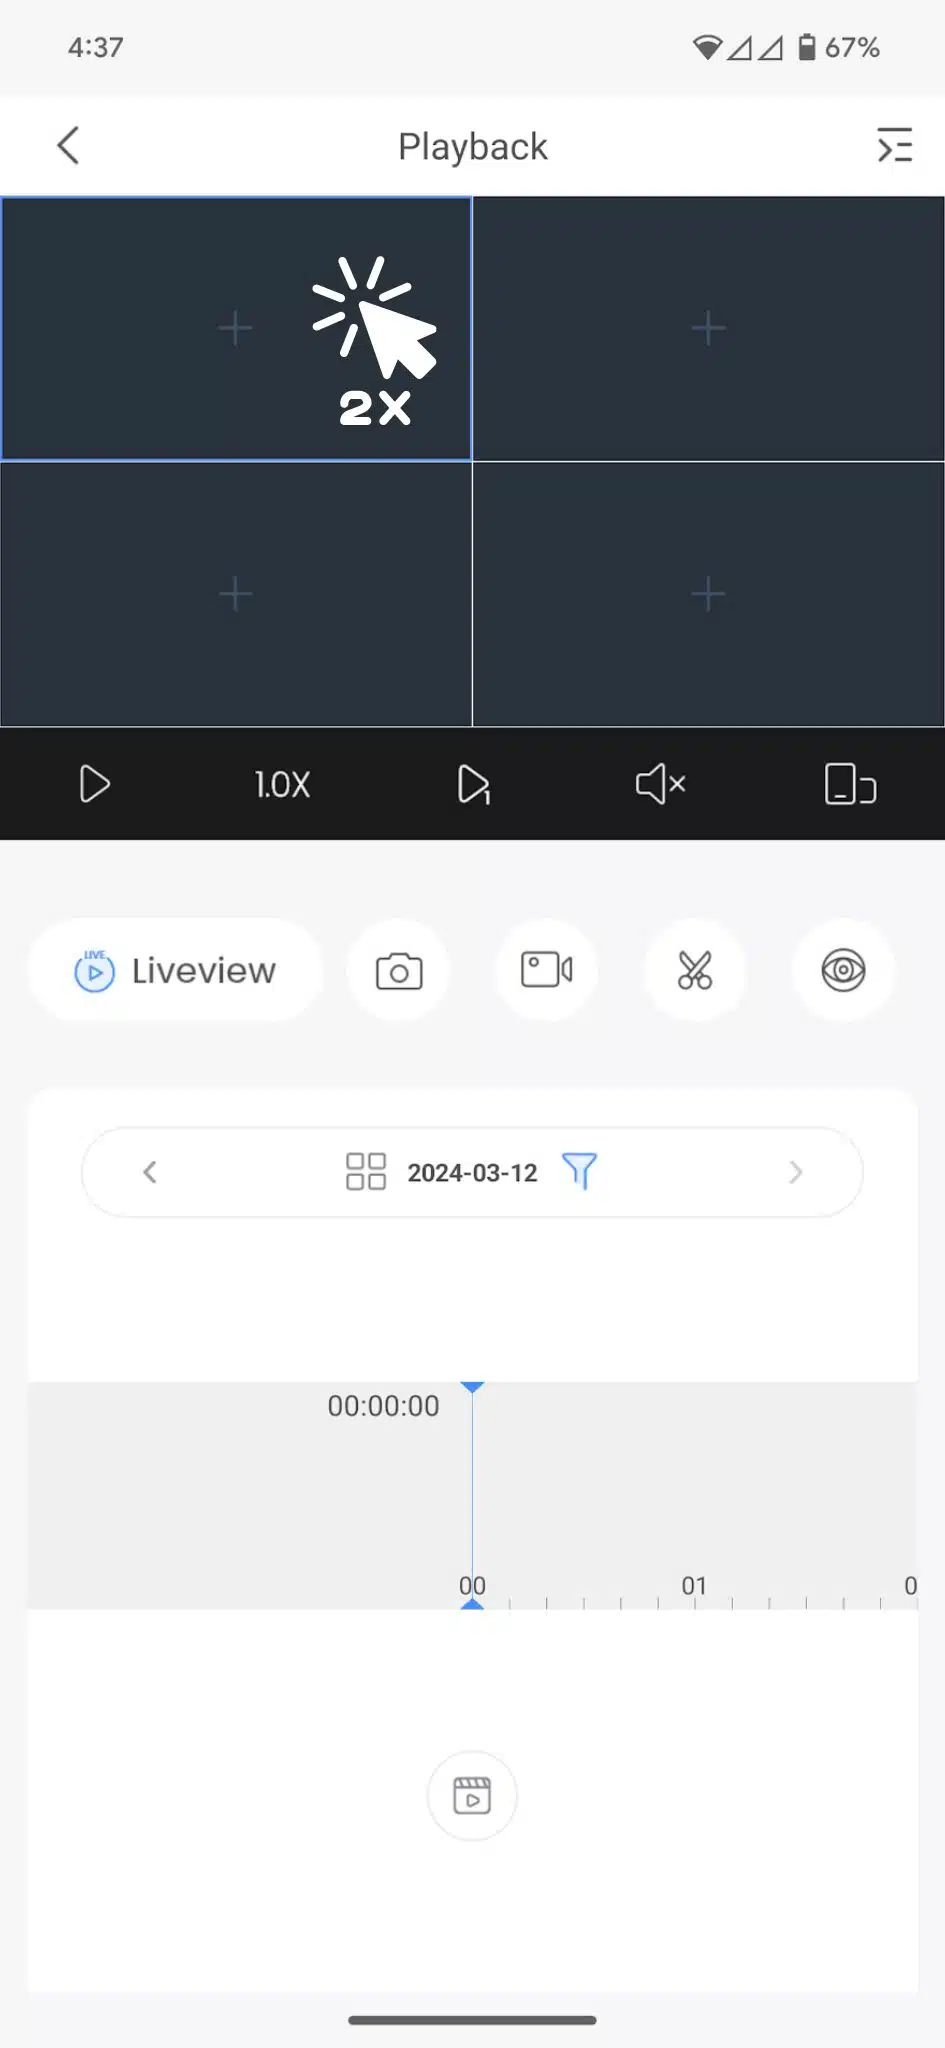
Tap the + sign to add cameras to the playback.
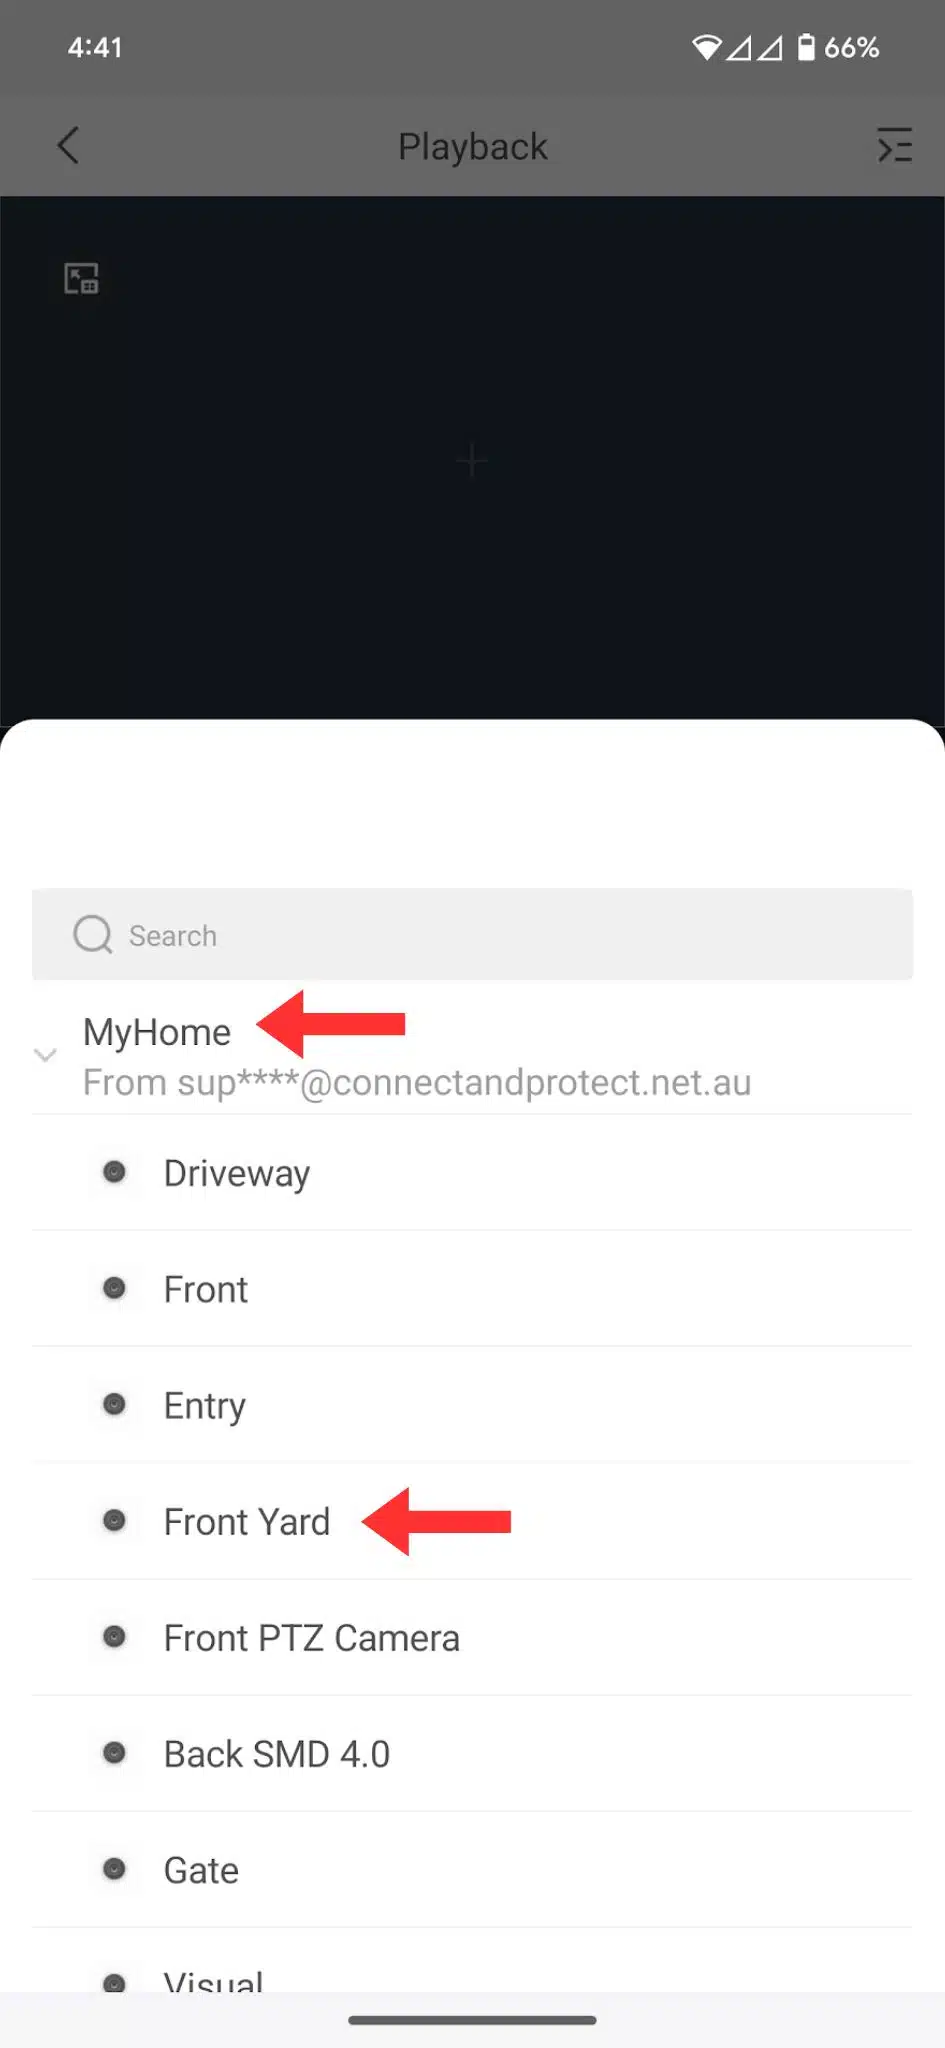
Step 3: Choose Cameras
Select Home and then choose the camera you wish to playback.
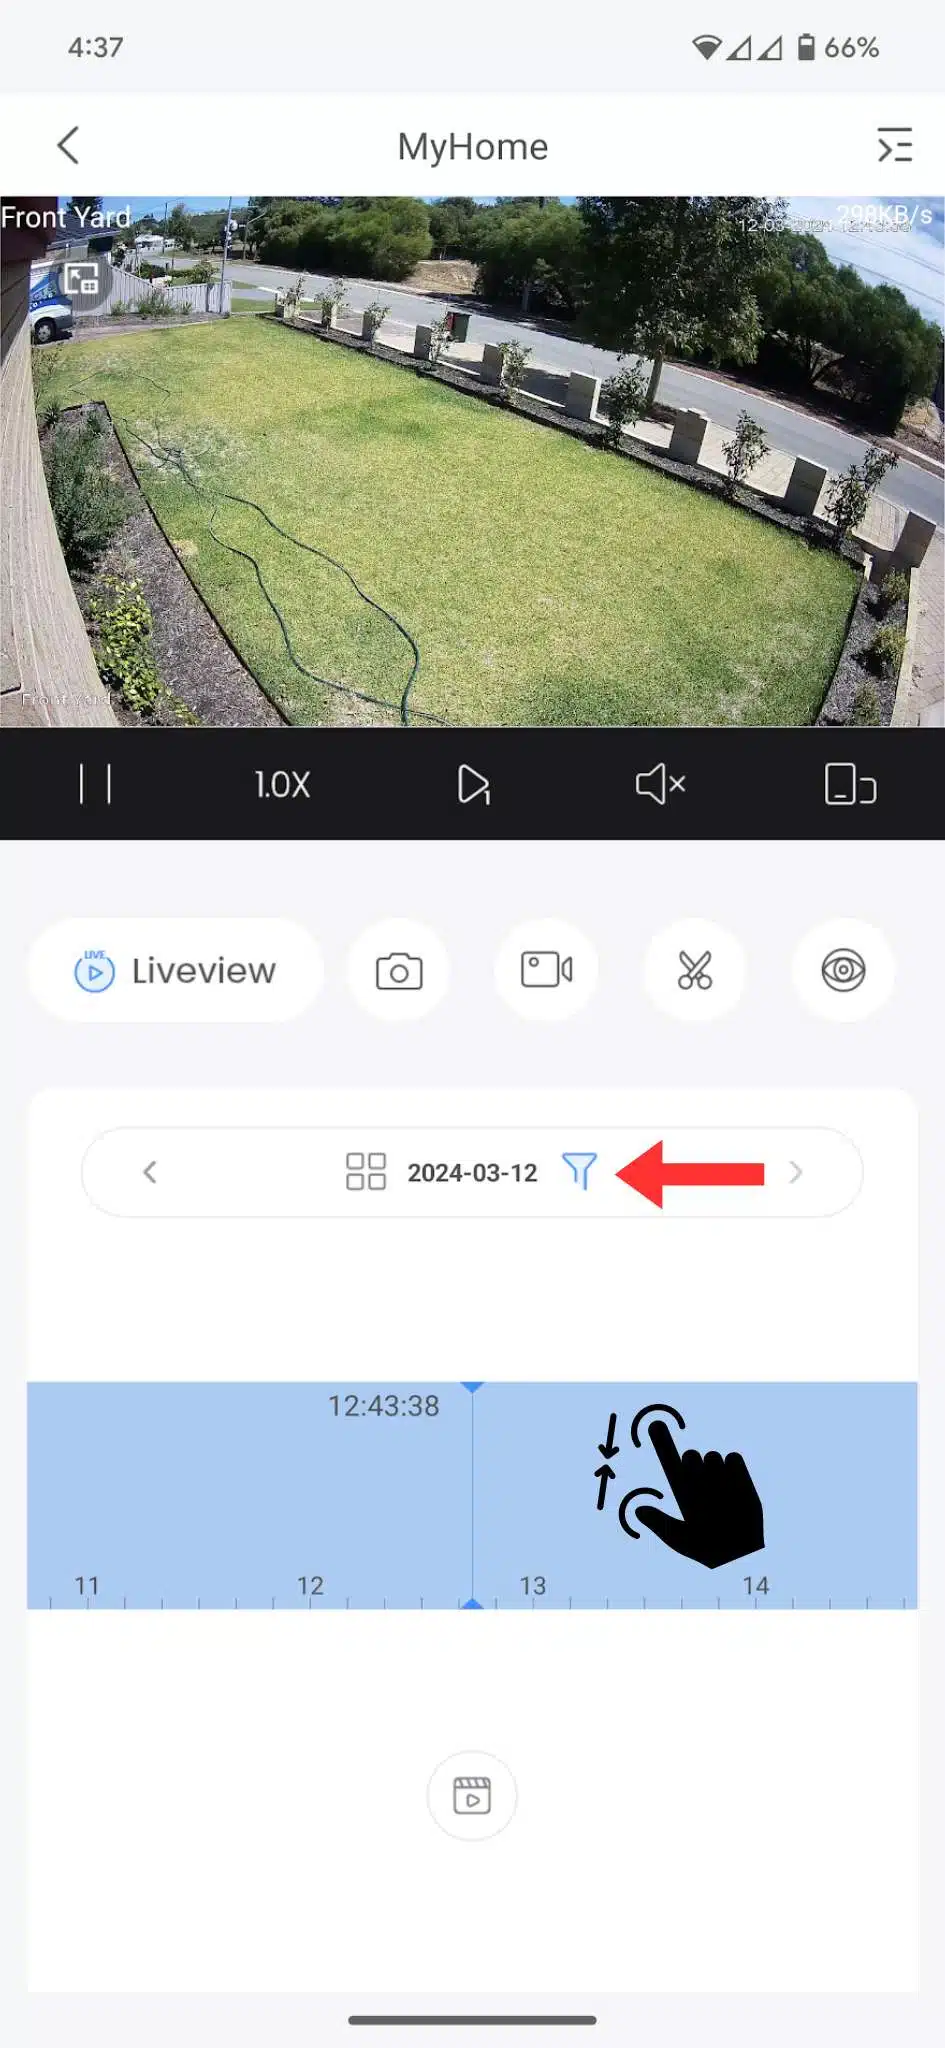
Step 4: Explore the Timeline
Once the timeline loads, scroll through to review footage.
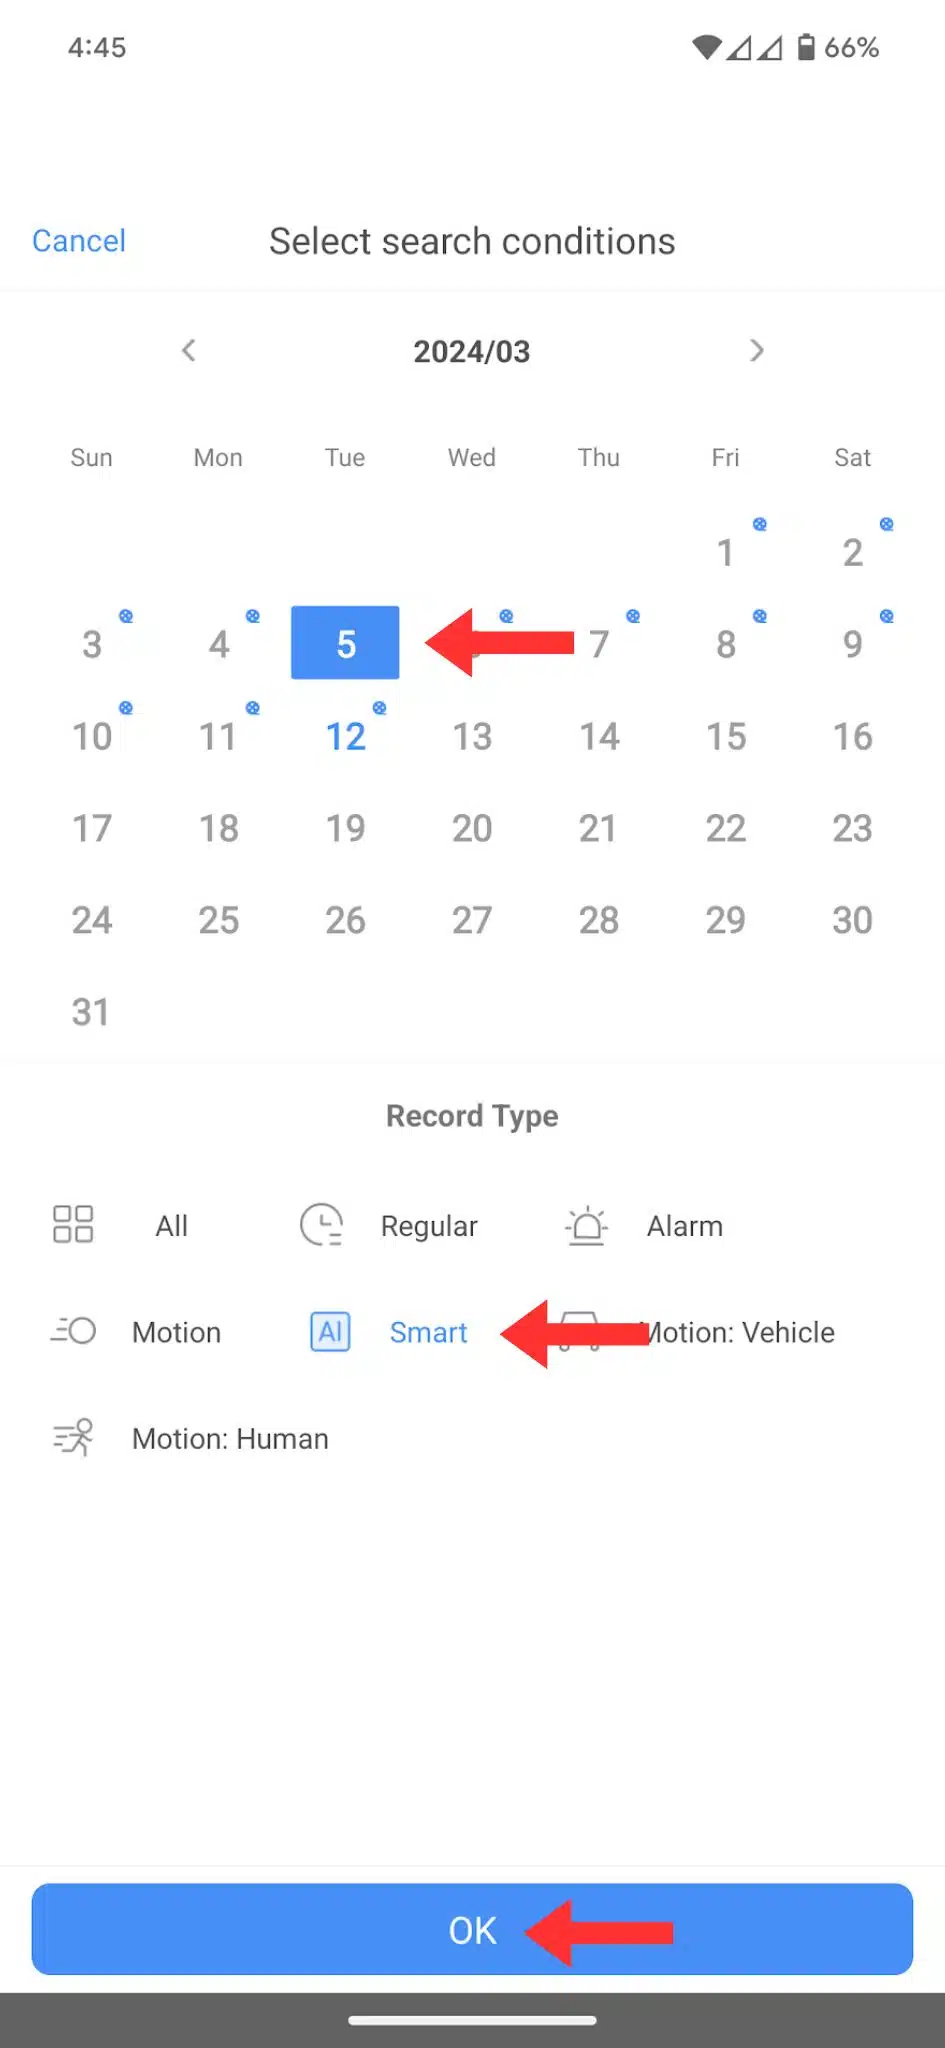
Step 5: Utilize Smart Playback
By selecting the date, you can opt for Smart playback to view events only.
Step 6: Capture or Clip
To capture an image, click the camera button. For clipping a segment, select the video camera button.
Send Photos or Videos
Step 1: Navigate to Your Media
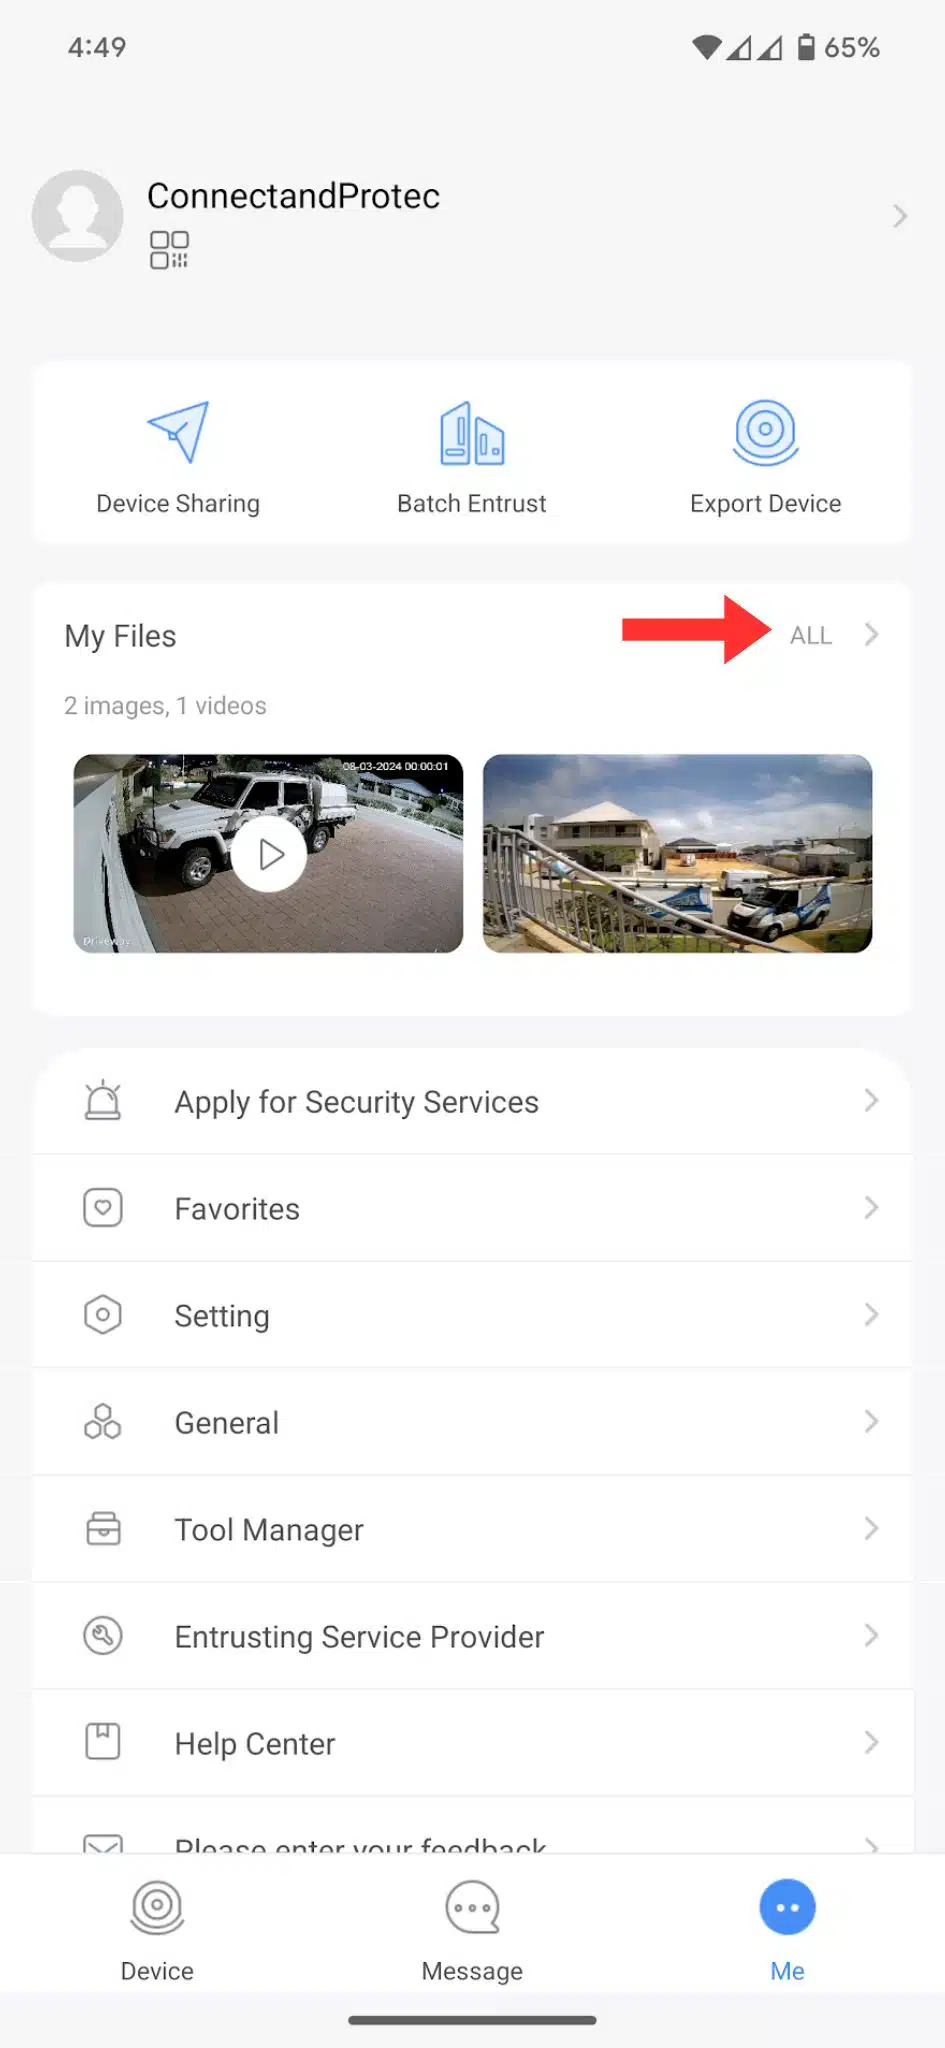
Go to ME in the app.
Select All to view your media library.
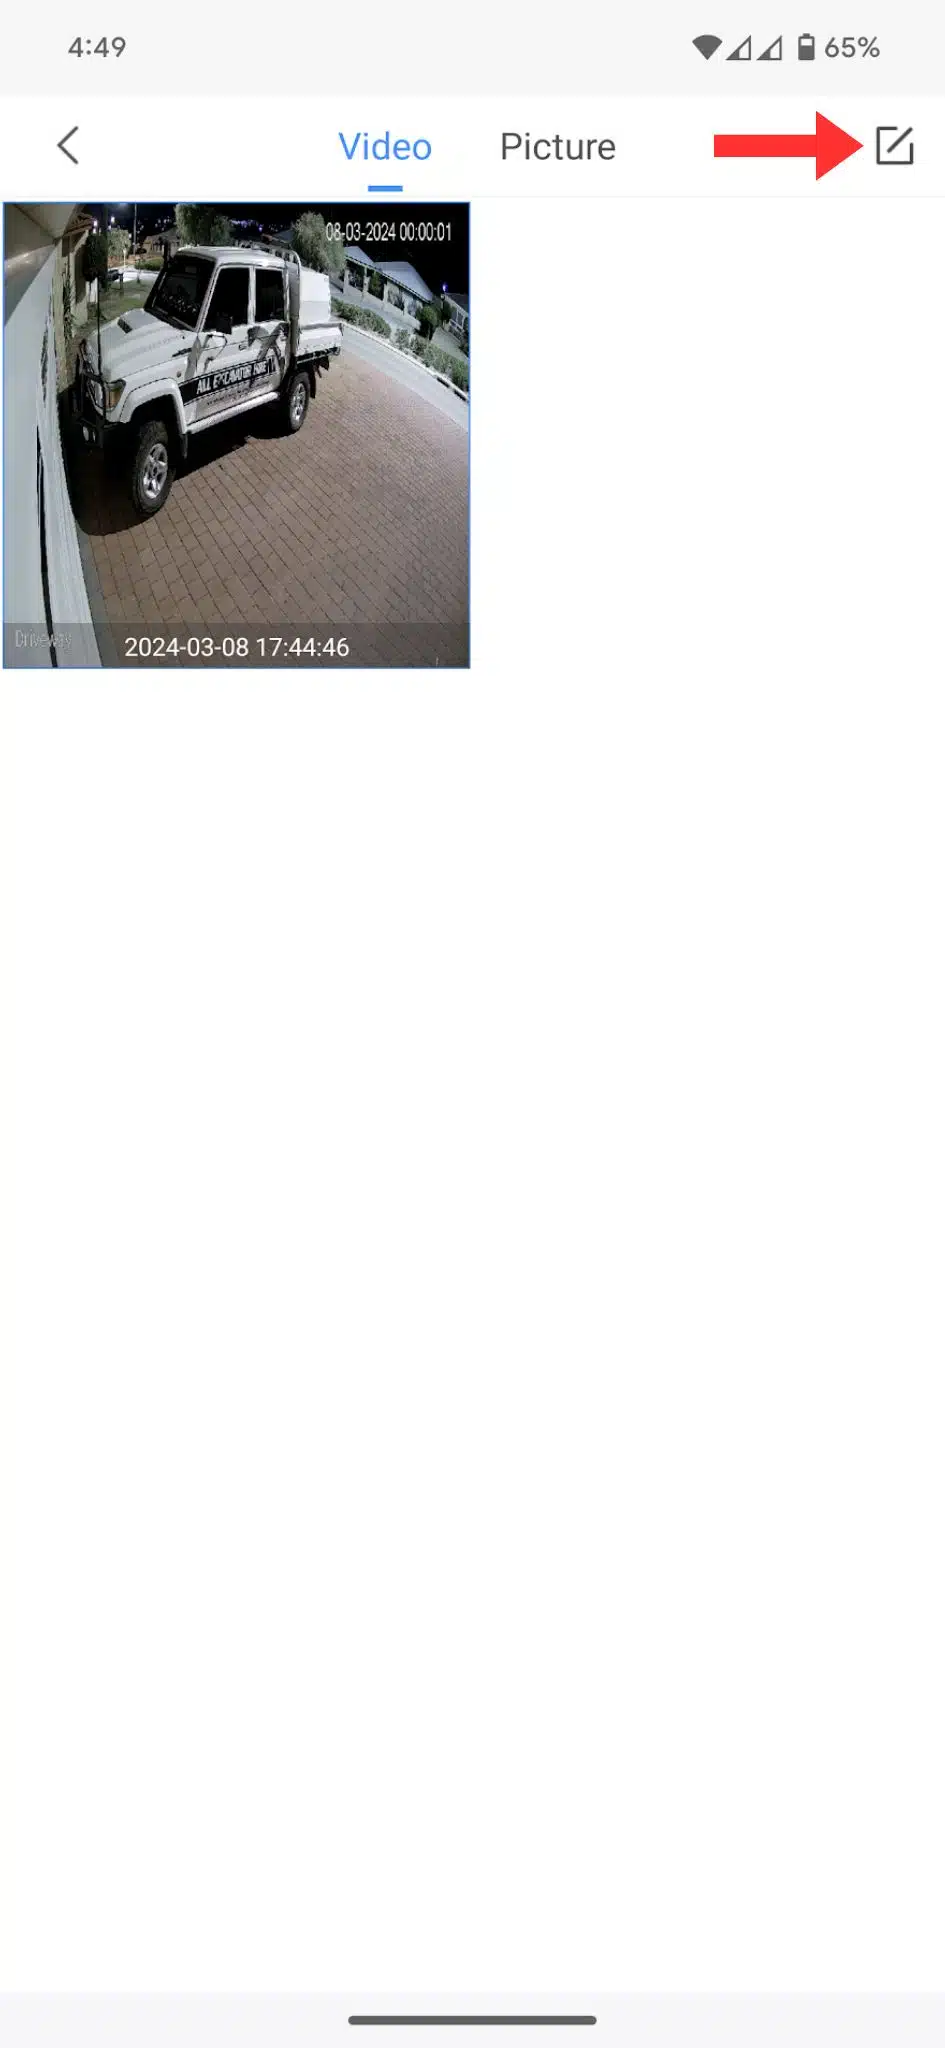
Step 2: Select Media to Send
From here, you can choose the images or videos you want to share.
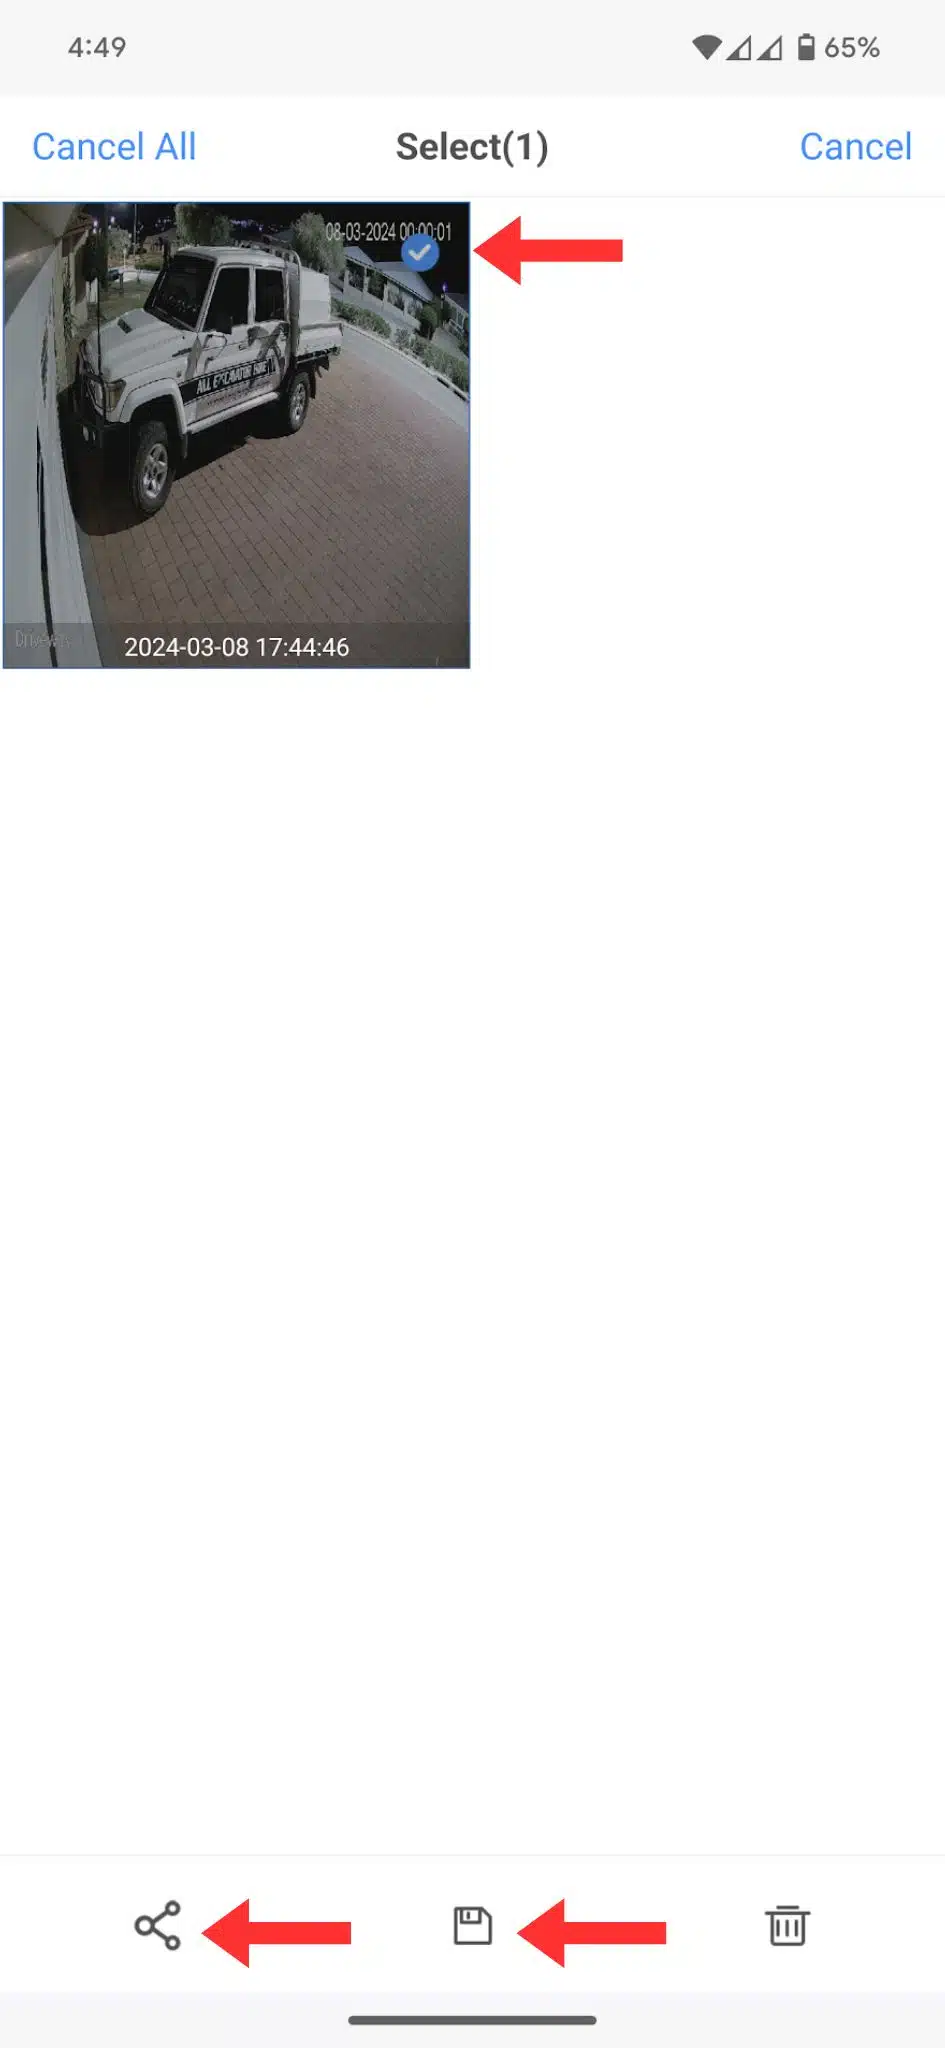
Step 3: Send Your Selected Media
After selection, proceed to send the chosen photos or videos to your intended recipient or platform.
By following these steps, you can easily share your photos and videos from within the app.
Activate Active Deterrent
Adjusting Active Deterrent Settings
To modify the settings for the active deterrent feature in your device, follow the steps outlined below:
Step 1: Access Device Details
Tap on the three dots (menu) within the app.
Choose “Device Details”.
Step 2: Manage Alarm Linkage
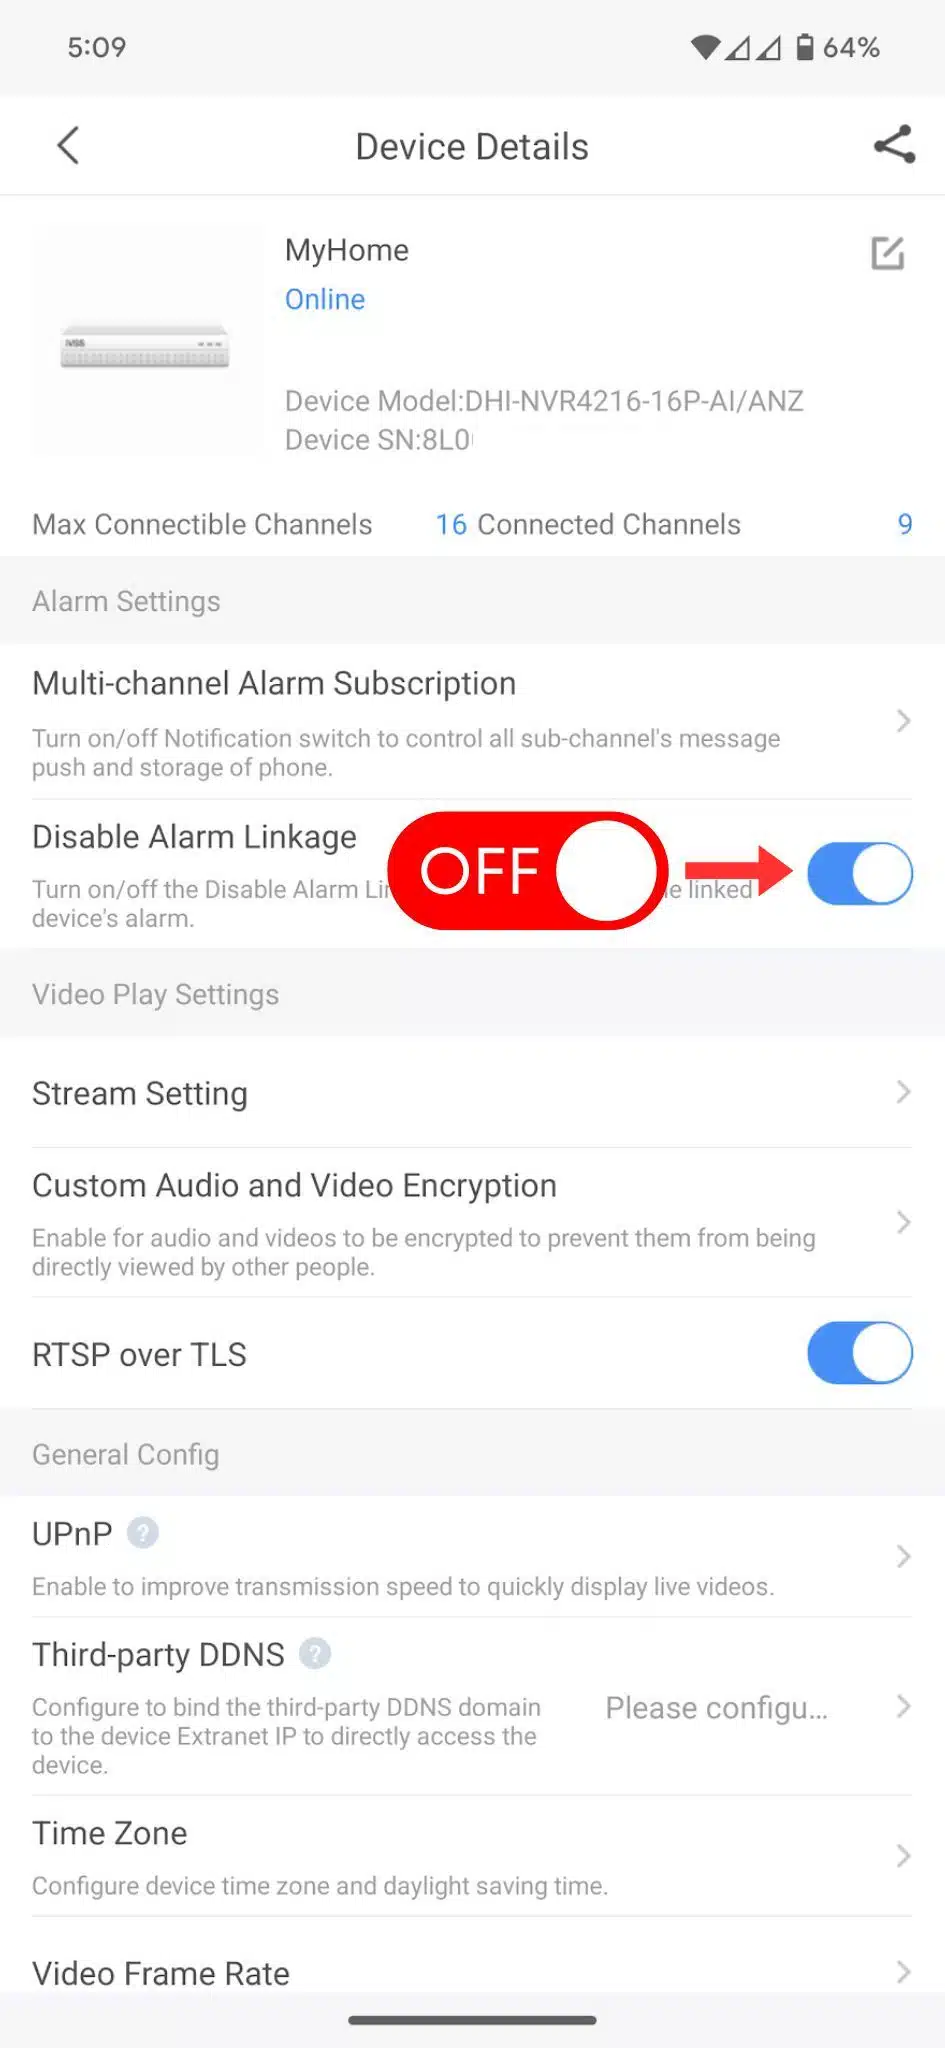
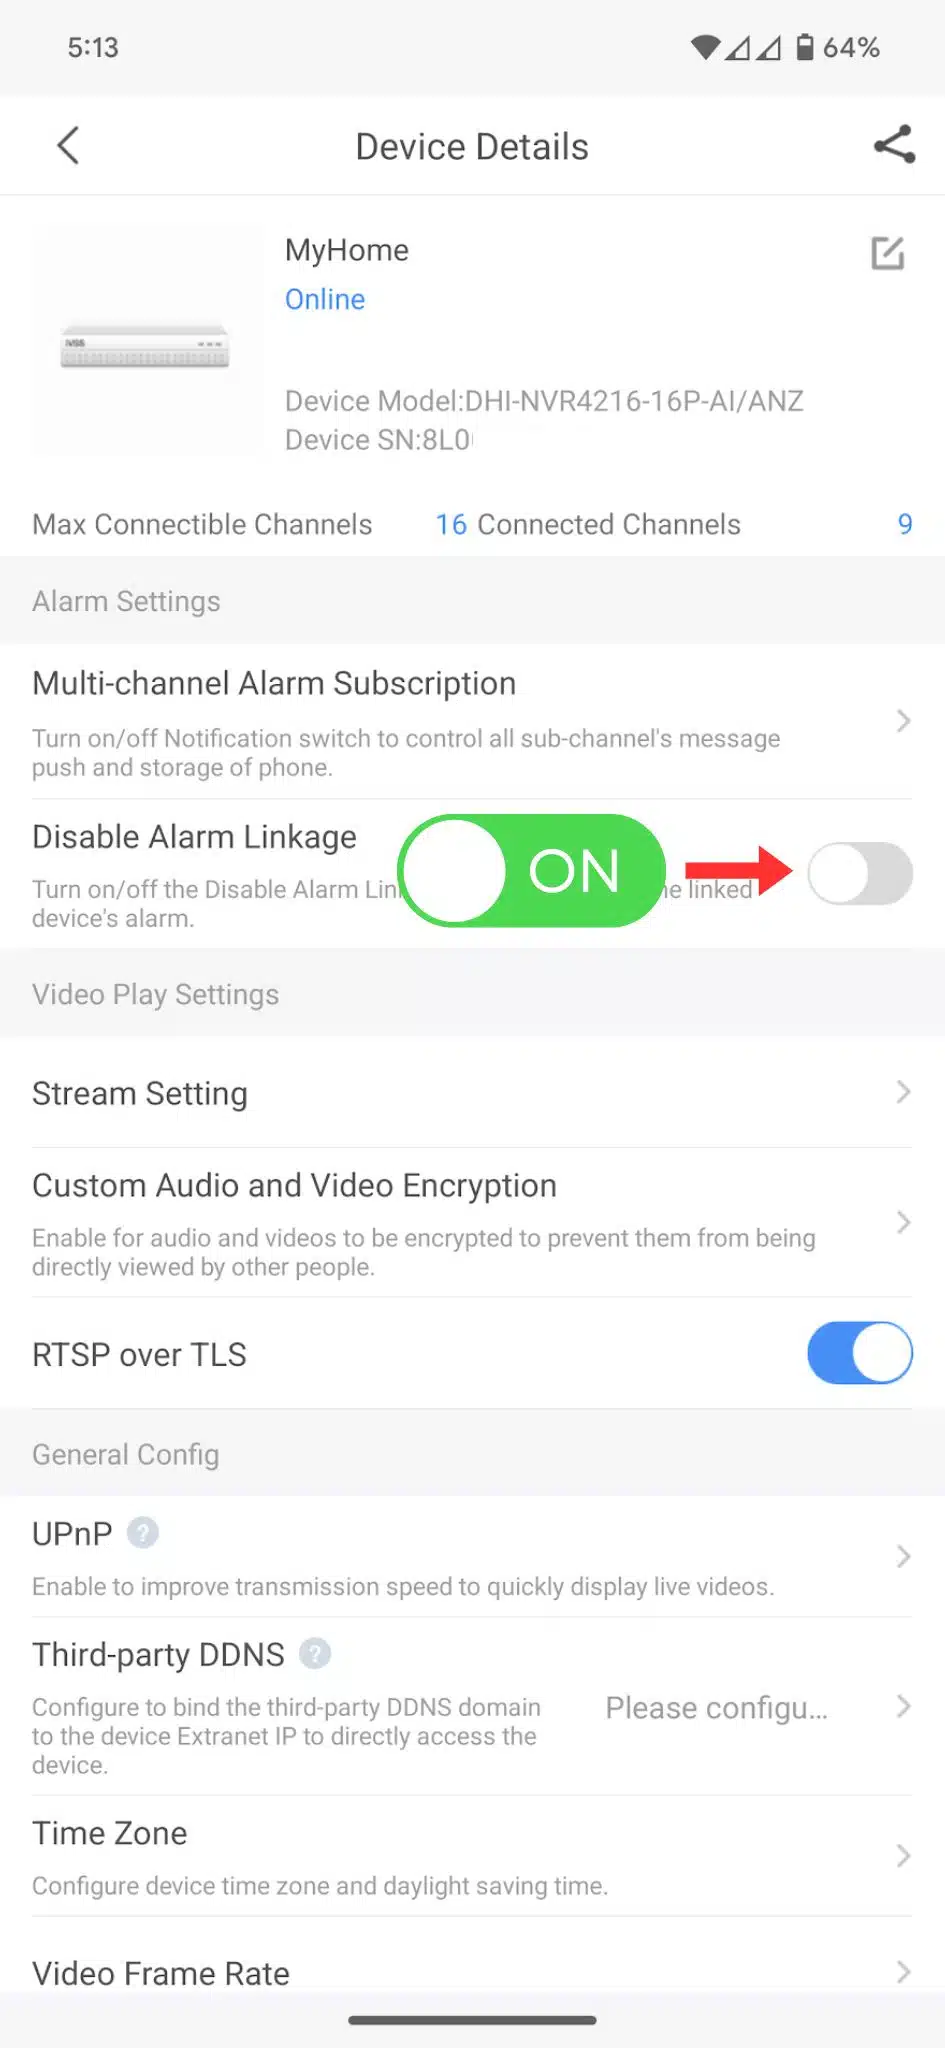
Within Device Details, look for and select “Disable Alarm Linkage”.
Important Note: Contrary to what the option might imply, activating “Disable Alarm Linkage” turns the active deterrent OFF. Conversely, deactivating this option turns the active deterrent ON.
Troubleshooting: Ensuring Active Deterrent is Enabled
If the active deterrent doesn’t activate as expected, a preset schedule might be interfering. To check and adjust this:
Step 1: Access Device Details Again
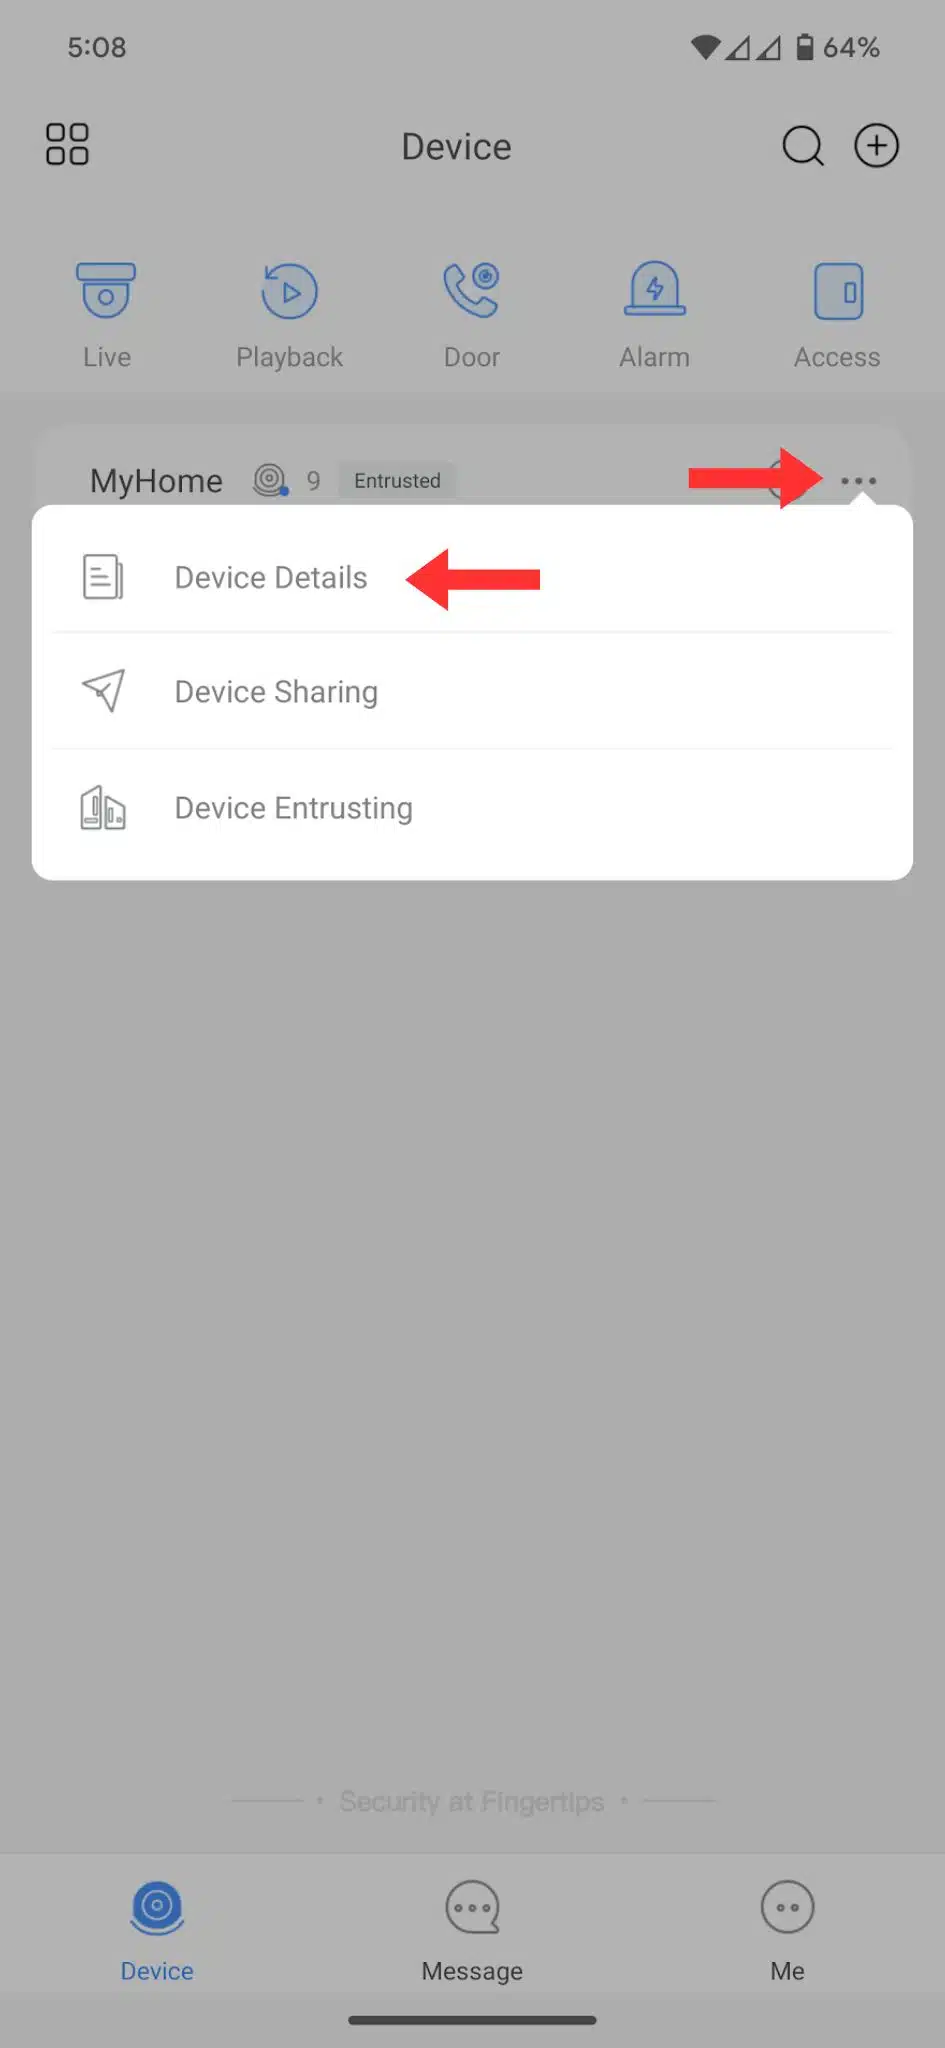
Tap the three dots (menu) and select “Device Details”.
Step 2: Check Schedule Settings
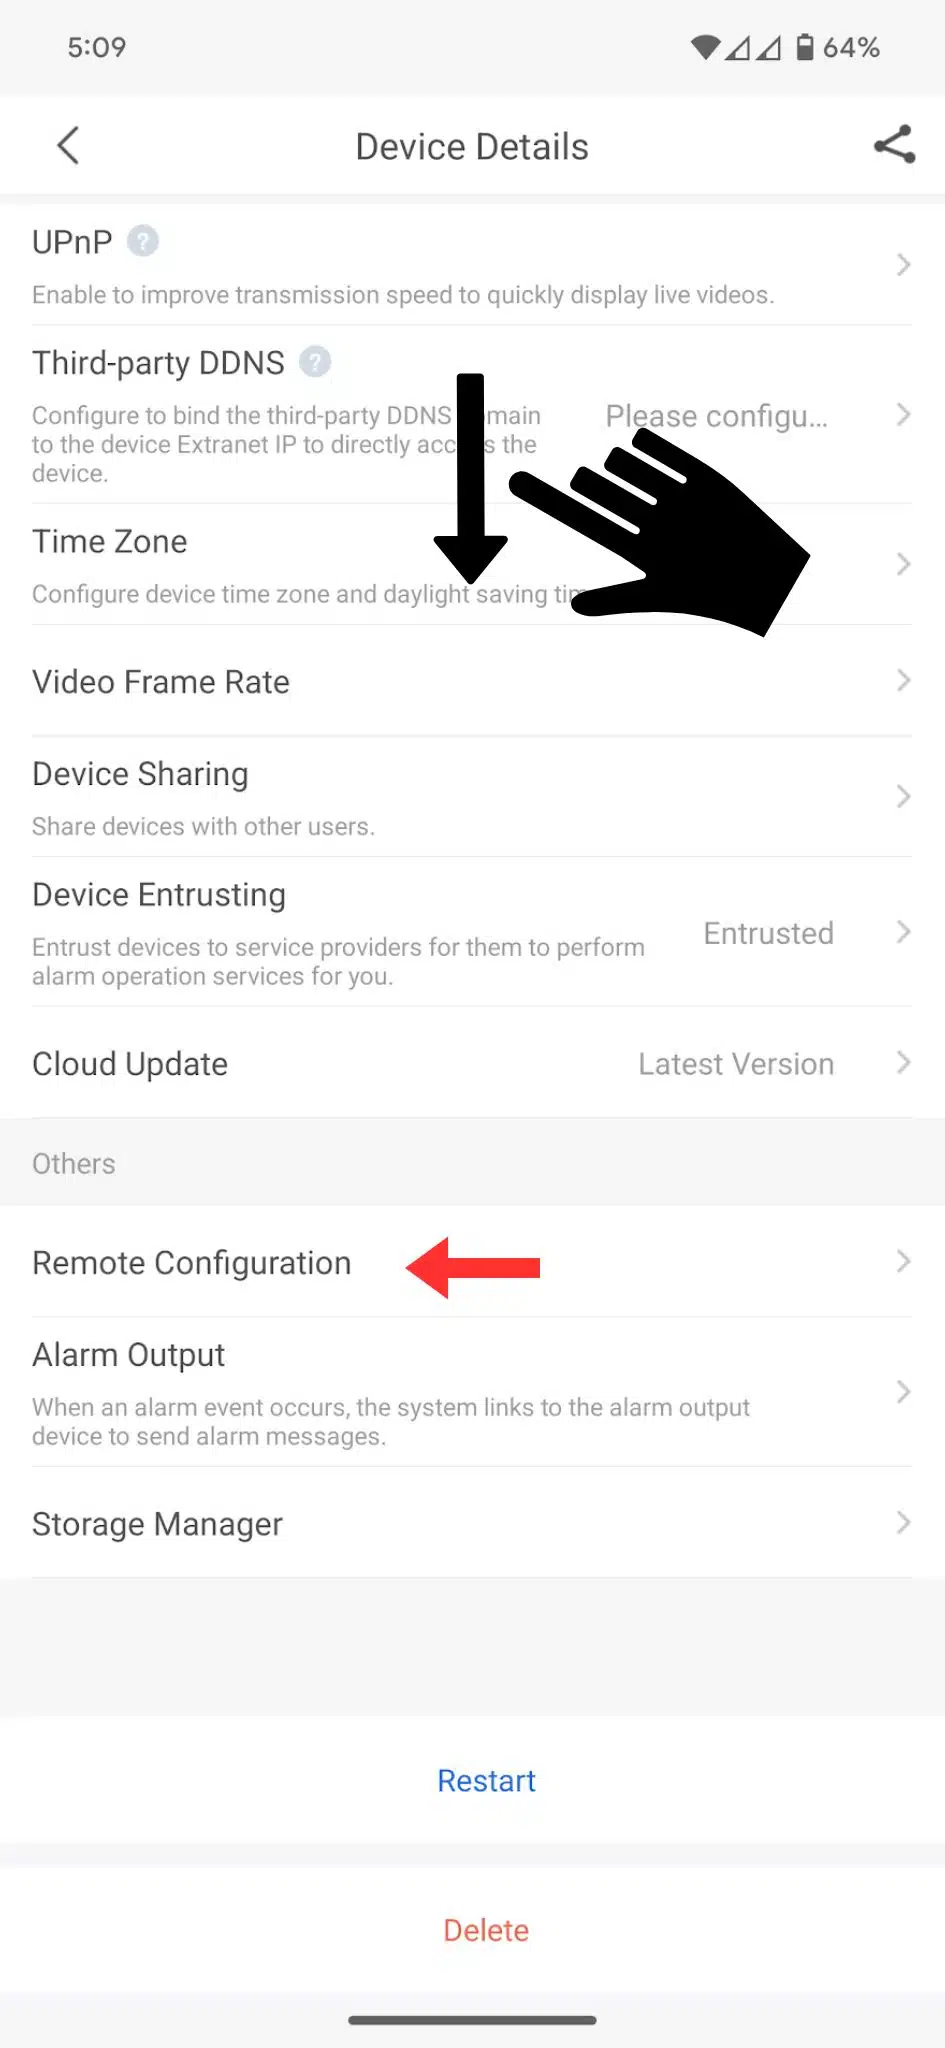
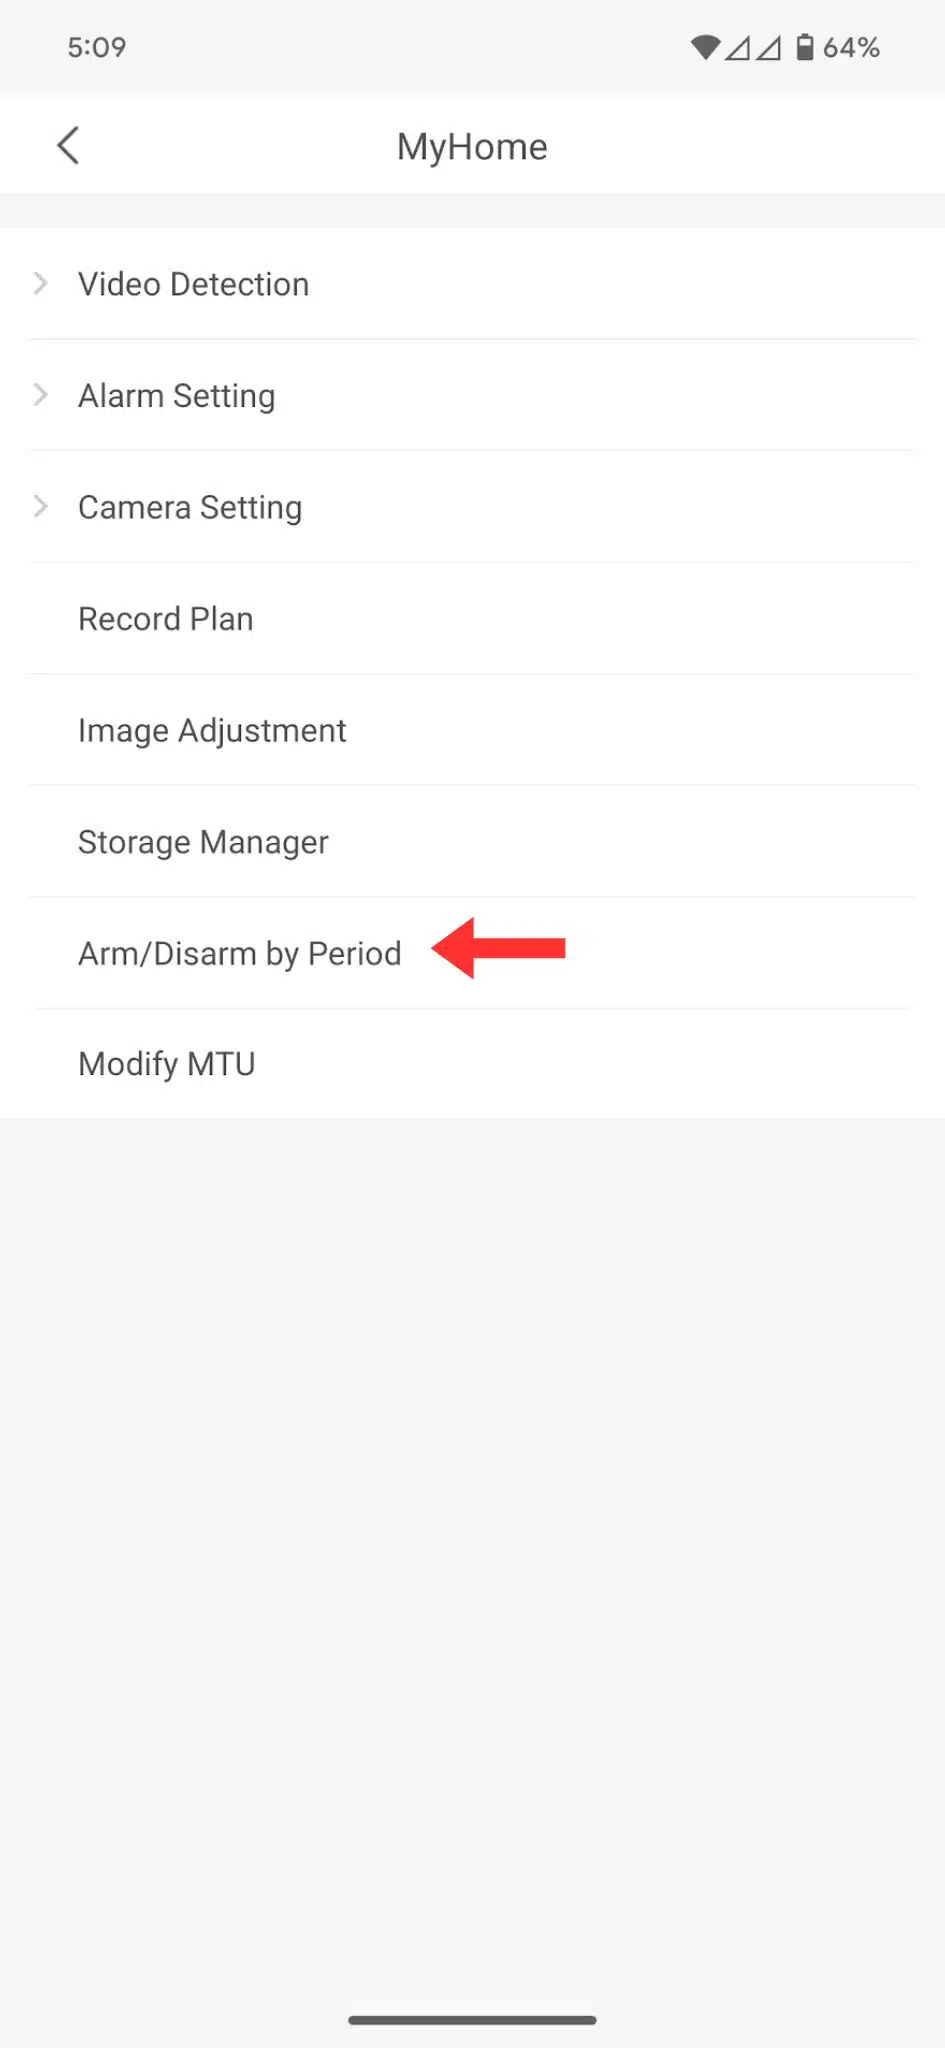
Navigate to “Remote Configuration” and choose “Arm/Disarm By Period”.
Should there be an active period set, it will take precedence over the active deterrent’s ON state, necessitating an adjustment in the schedule to align with your preferences.
Change the Active Deterrent Schedule
Modifying the Schedule for Active Deterrent
Adjusting the active deterrent’s operational schedule is straightforward with the following steps:
Step 1: Access Remote Configuration
Start by tapping the three dots (menu) in the app.
Select “Device Details” and proceed to “Remote Configuration”.
Step 2: Set Arm/Disarm Period
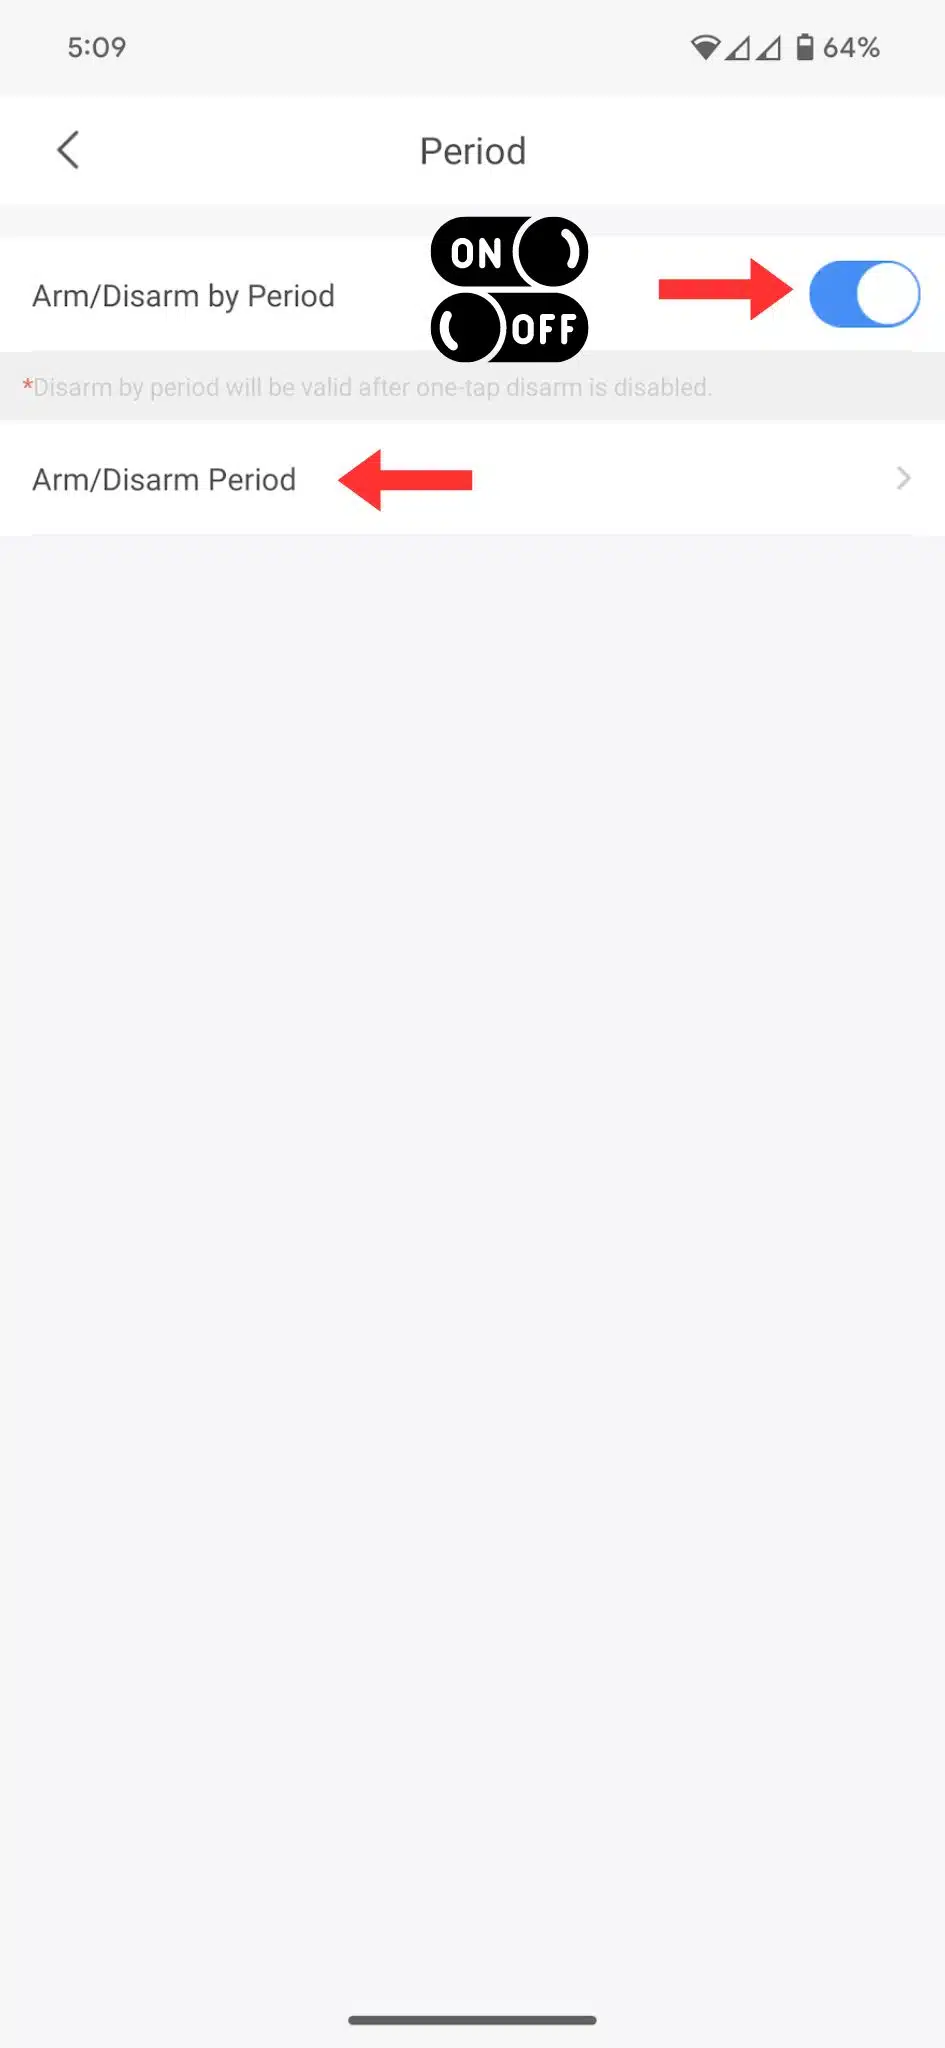
In the Remote Configuration menu, choose “Arm/Disarm By Period”.
Important Considerations:
Be aware that if a period is set, it will take precedence over the manual ON setting for the active deterrent.
To have the active deterrent operational at all times, ensure the “Arm/Disarm By Period” option is turned off.
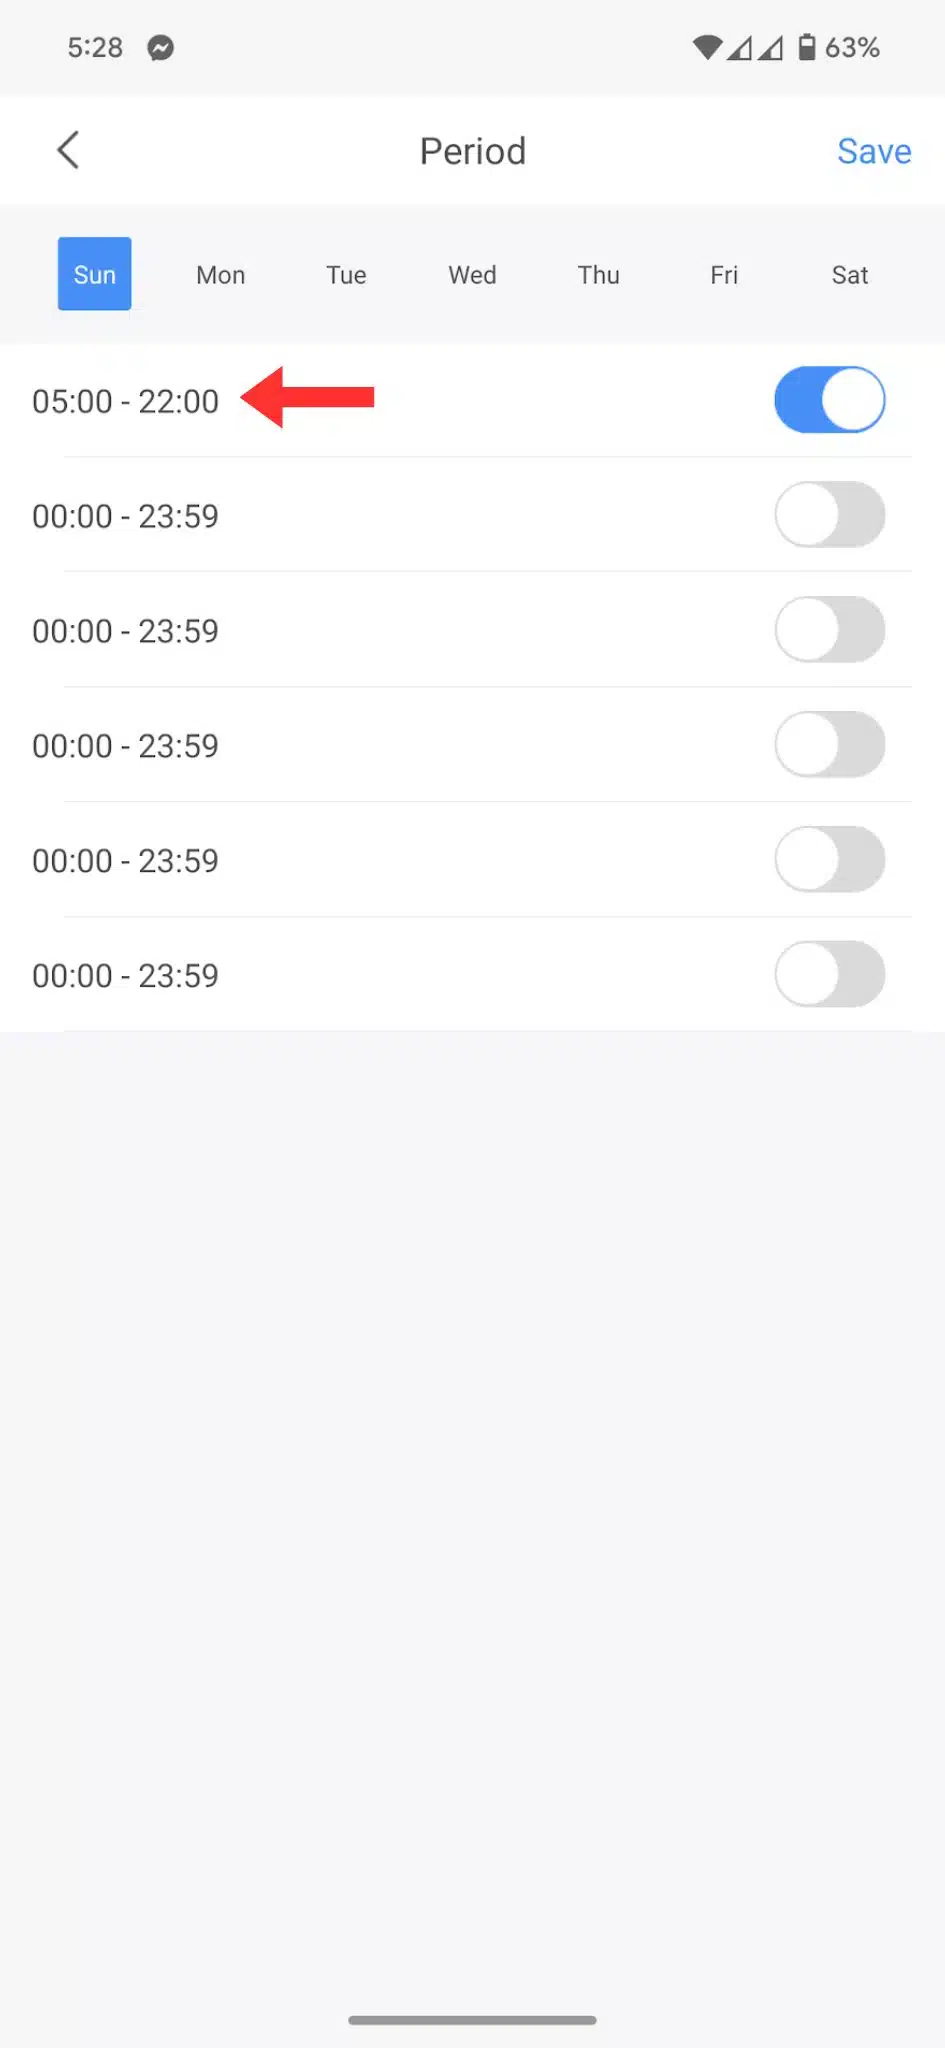
Adjusting the Period:
The period settings enable you to define specific times for the active deterrent to be off. For instance, configuring the deterrent to be off from 5 AM to 10 PM means it will only be armed outside these hours, providing flexibility based on your needs and preferences.
Two-Way Talk with TiOC’s
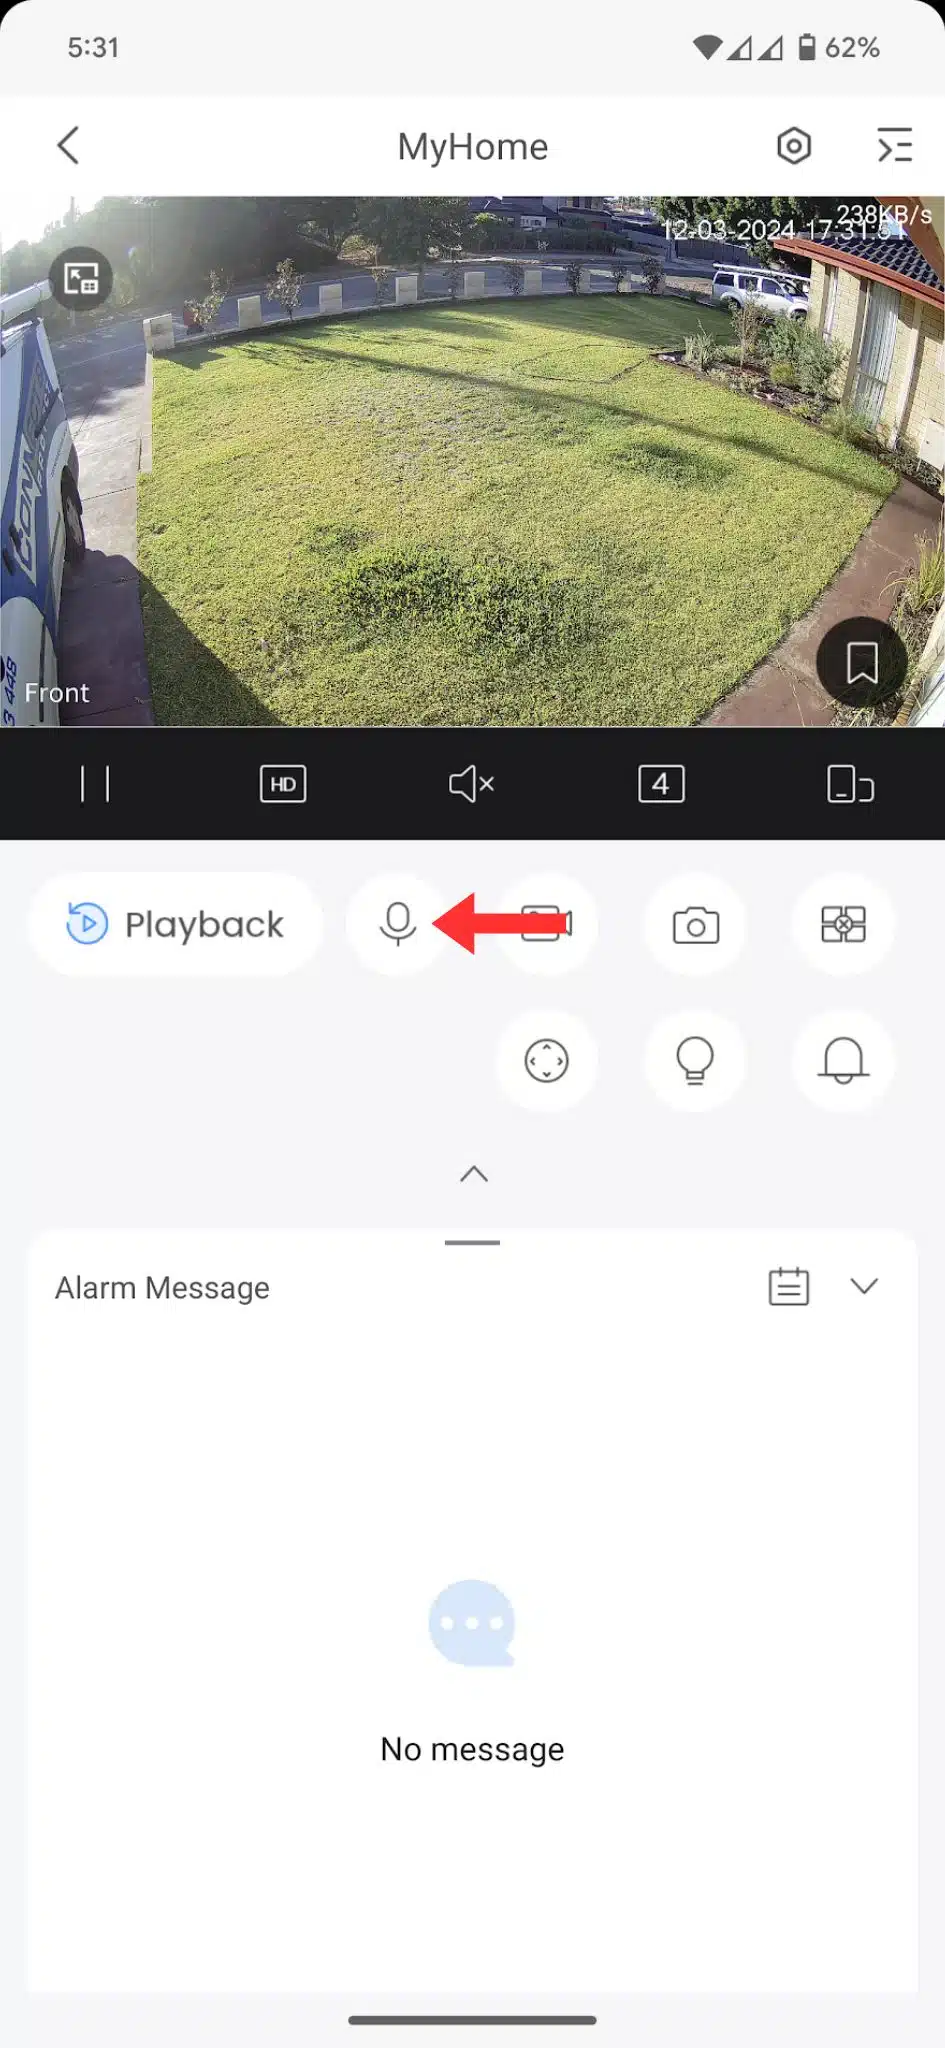
Engaging in two-way communication using TiOC cameras is a seamless process, whether you’re in multiscreen or single screen mode. Here’s how:
Step 1: Select Your Camera
Ensure the camera you wish to communicate through is selected. This can be done in either multiscreen mode or single screen mode.
Step 2: Initiate Two-Way Talk
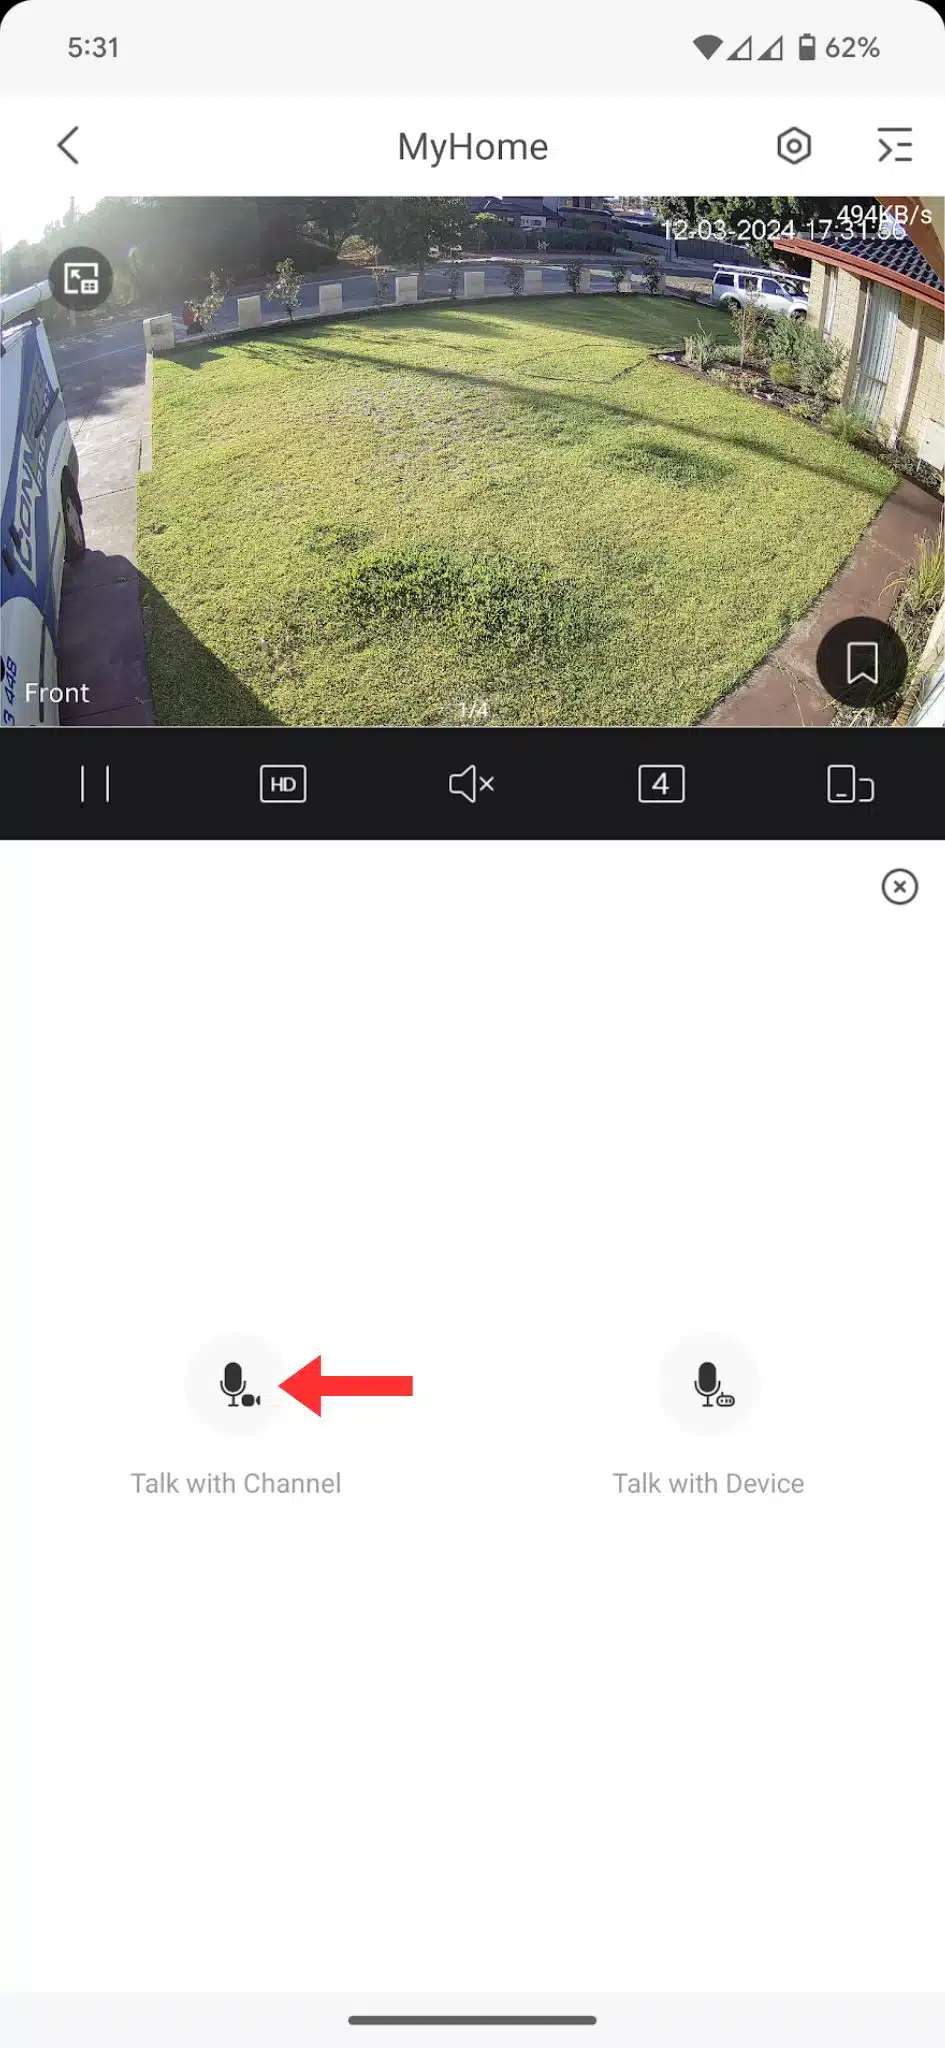
Look for the microphone button on the screen. Once you find it, select it to activate the two-way talk feature.
Step 3: Start Talking
After pressing the microphone button, you’re ready to start speaking. The selected channel will transmit your voice through the camera, allowing for real-time communication.
By following these steps, you can effortlessly communicate through your TiOC camera, making it simple to interact with individuals near the camera or to issue verbal commands directly.
Troubleshooting
Notifications Are Not Working
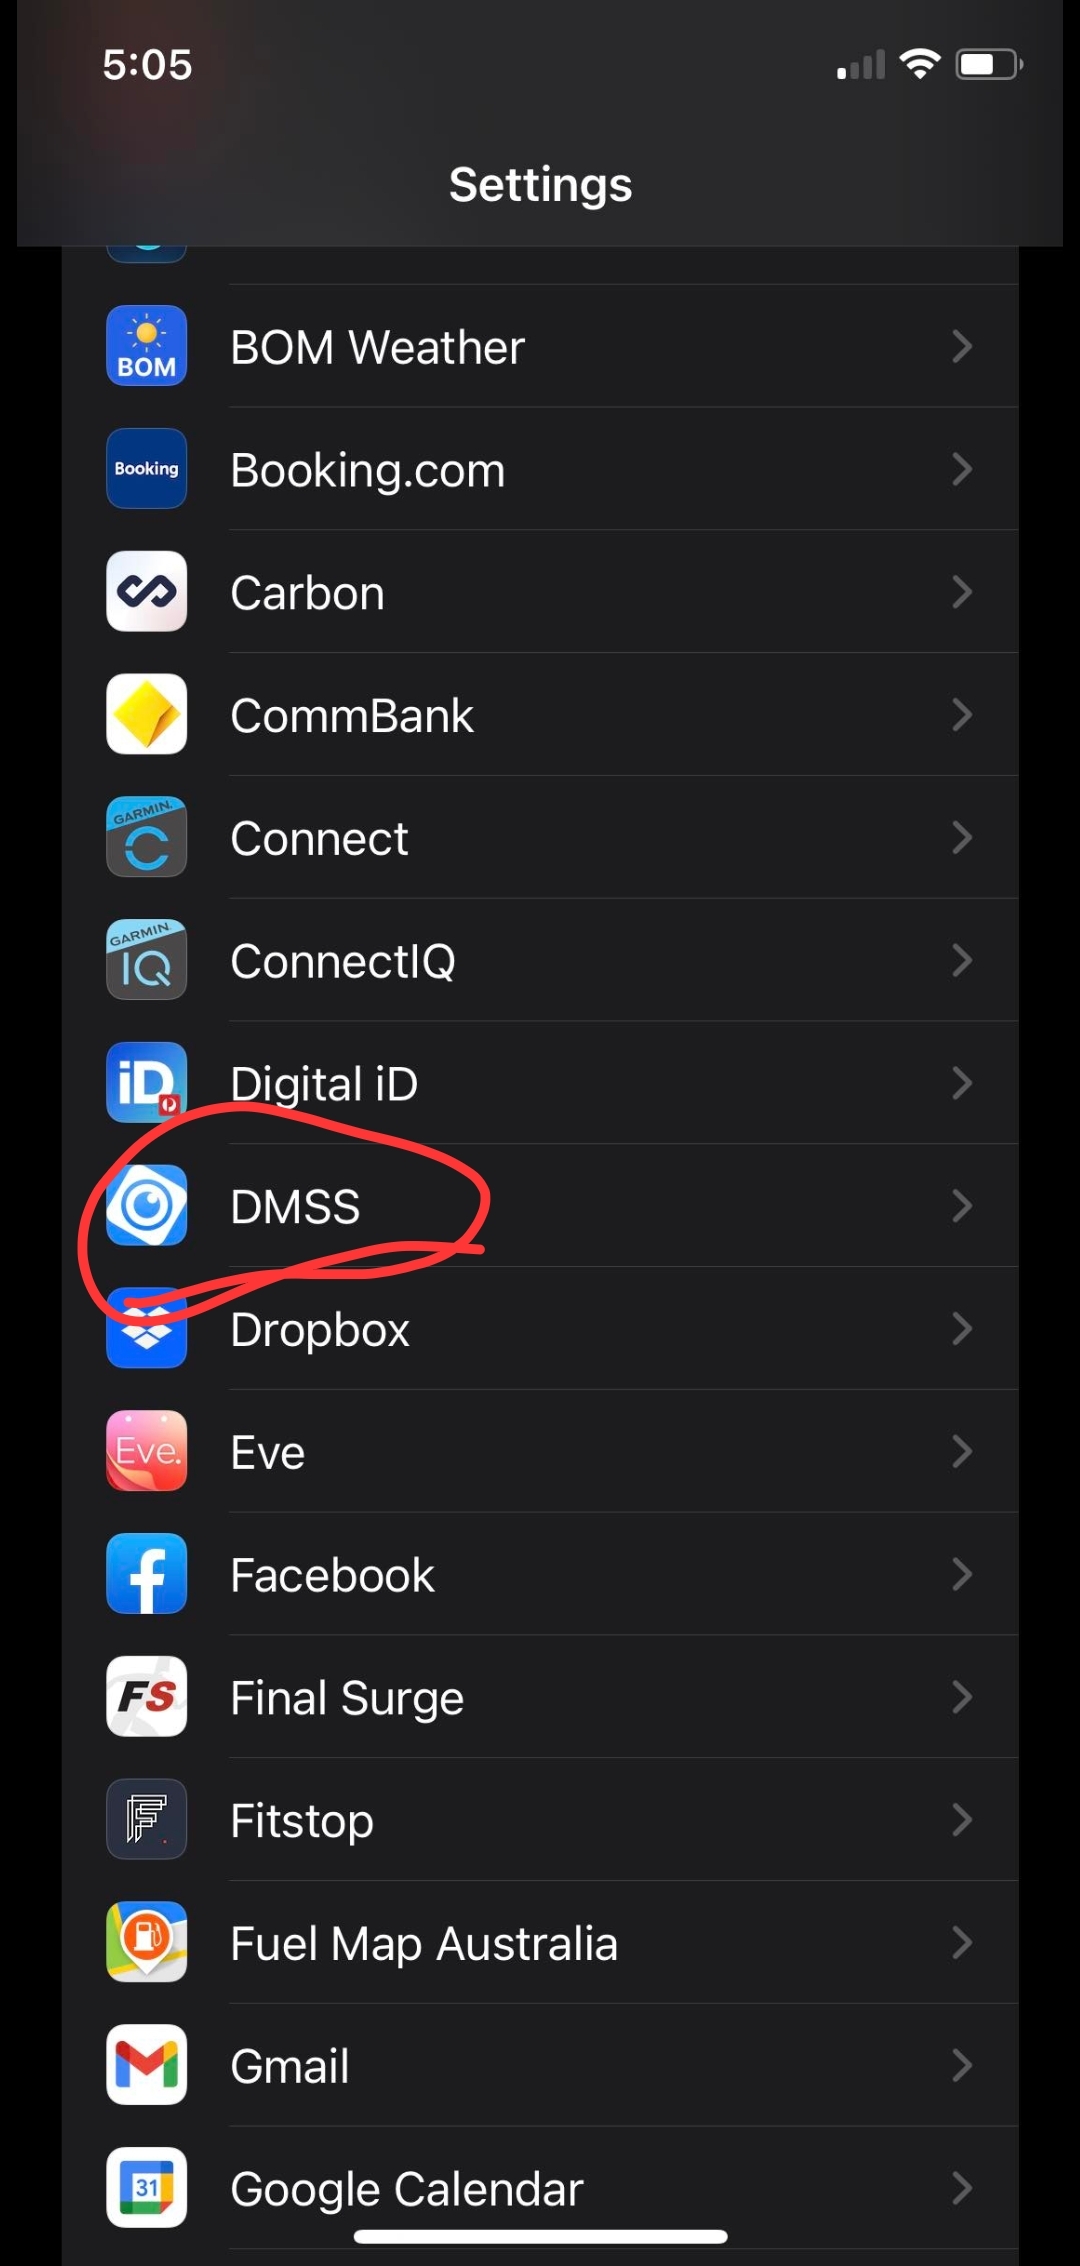
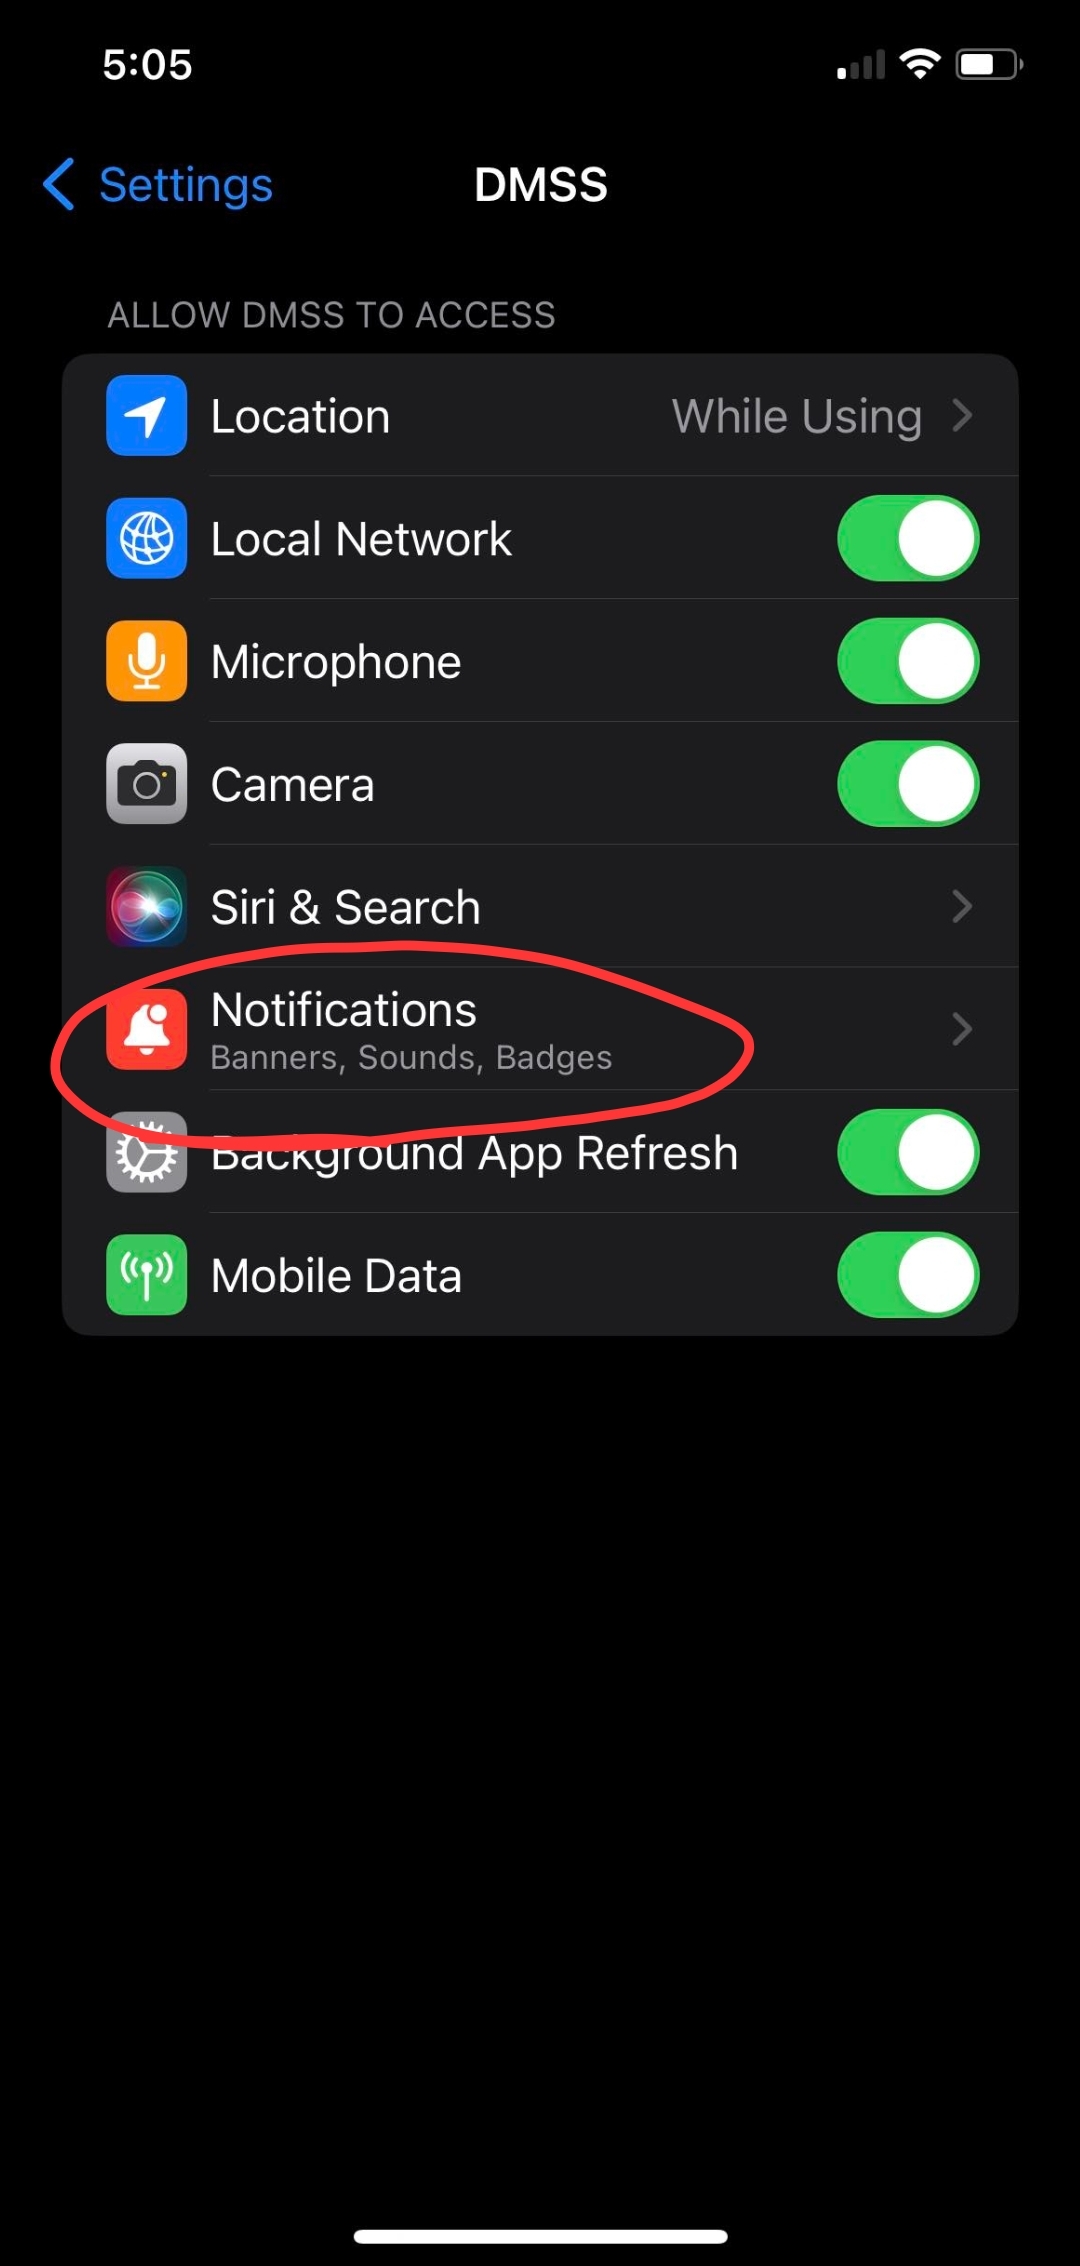
1. Check your device settings: Ensure that you’re not blocking notifications from the DMSS app.
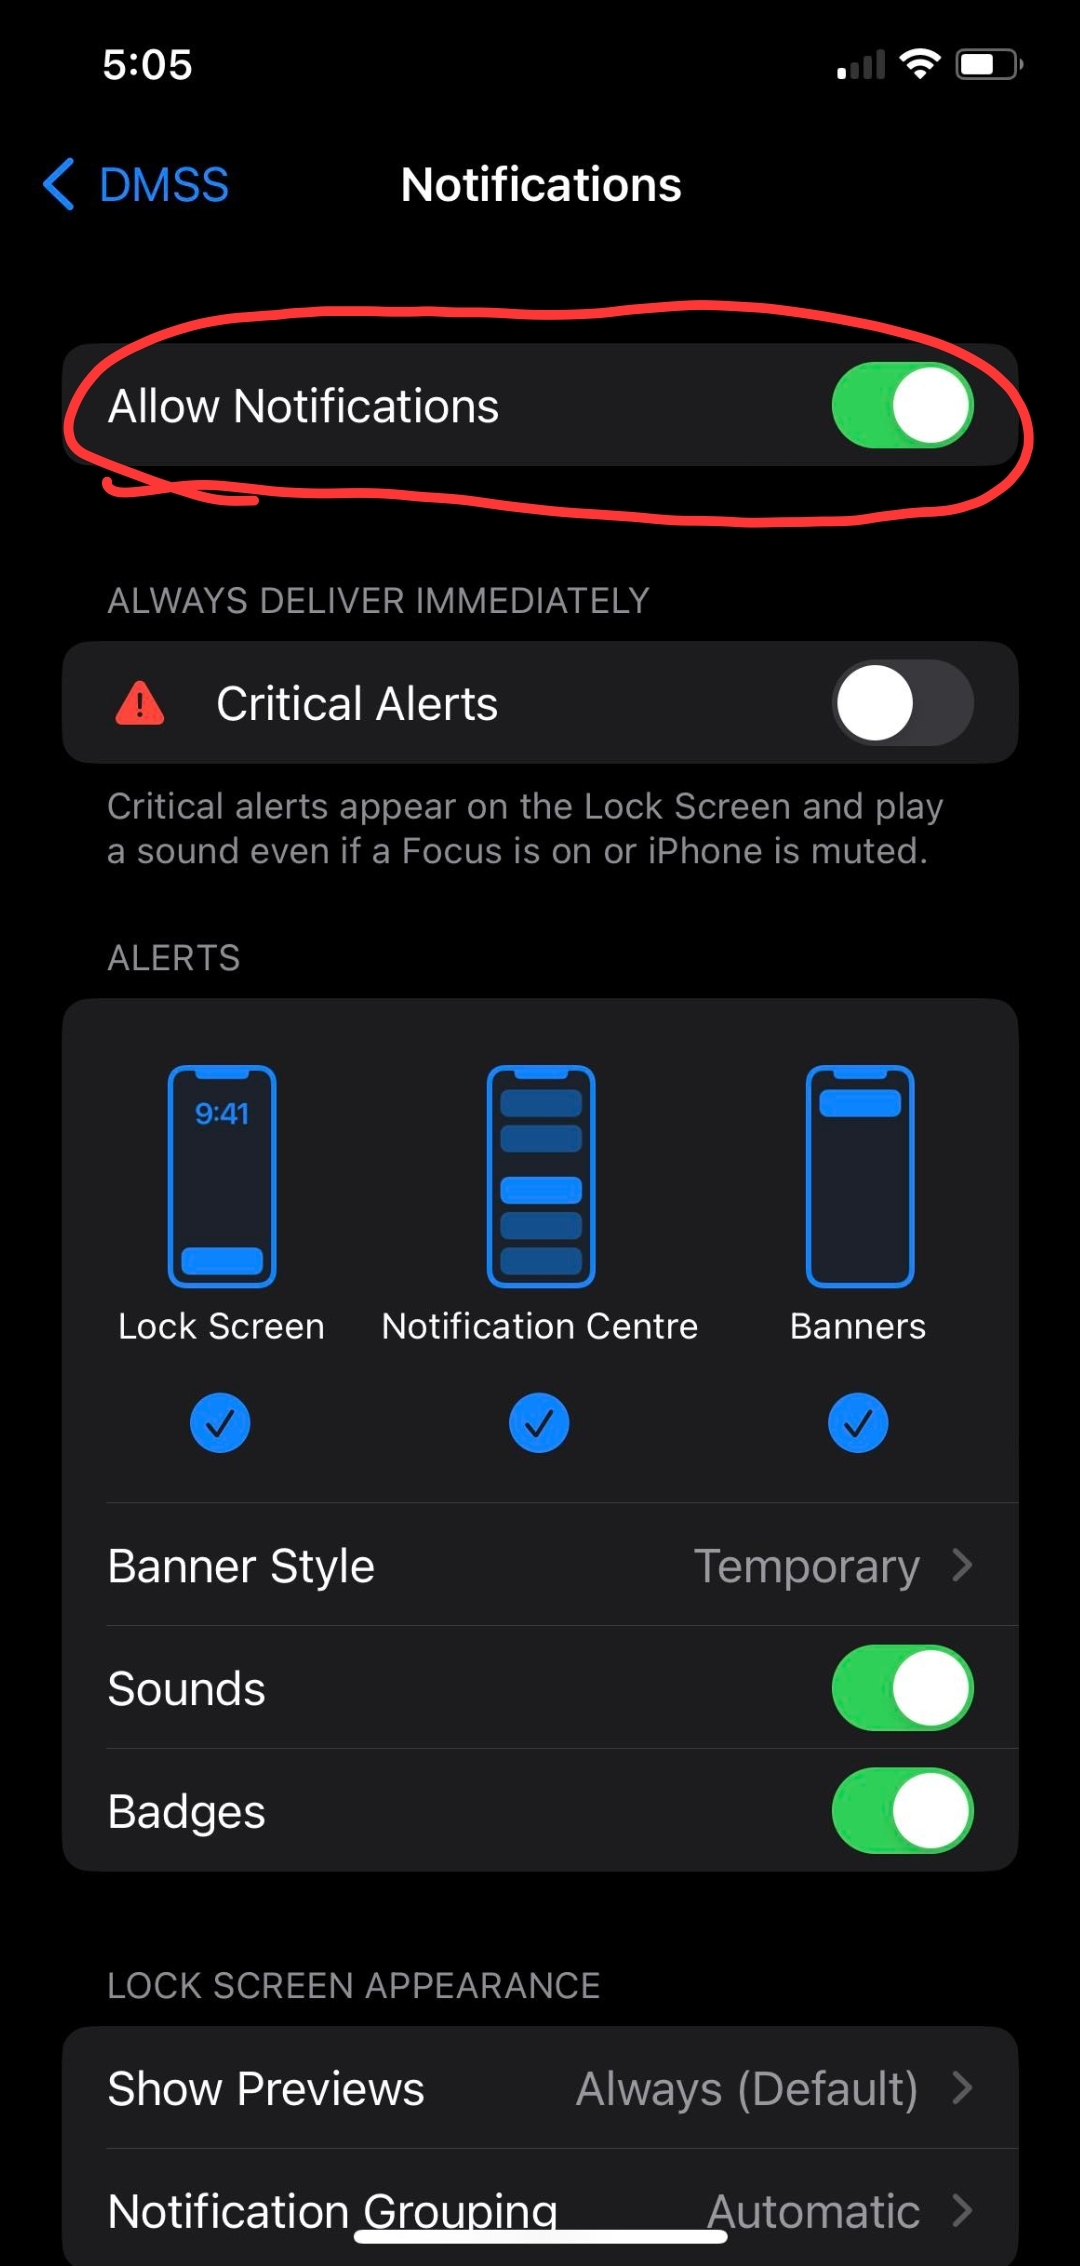
For iPhone: Navigate to Settings > scroll down and select DMSS > Notifications > ensure they are allowed.
Note: If you’re using iPhone’s “Do Not Disturb” or “Focus” modes, make sure you have enabled notifications specifically for the DMSS app.
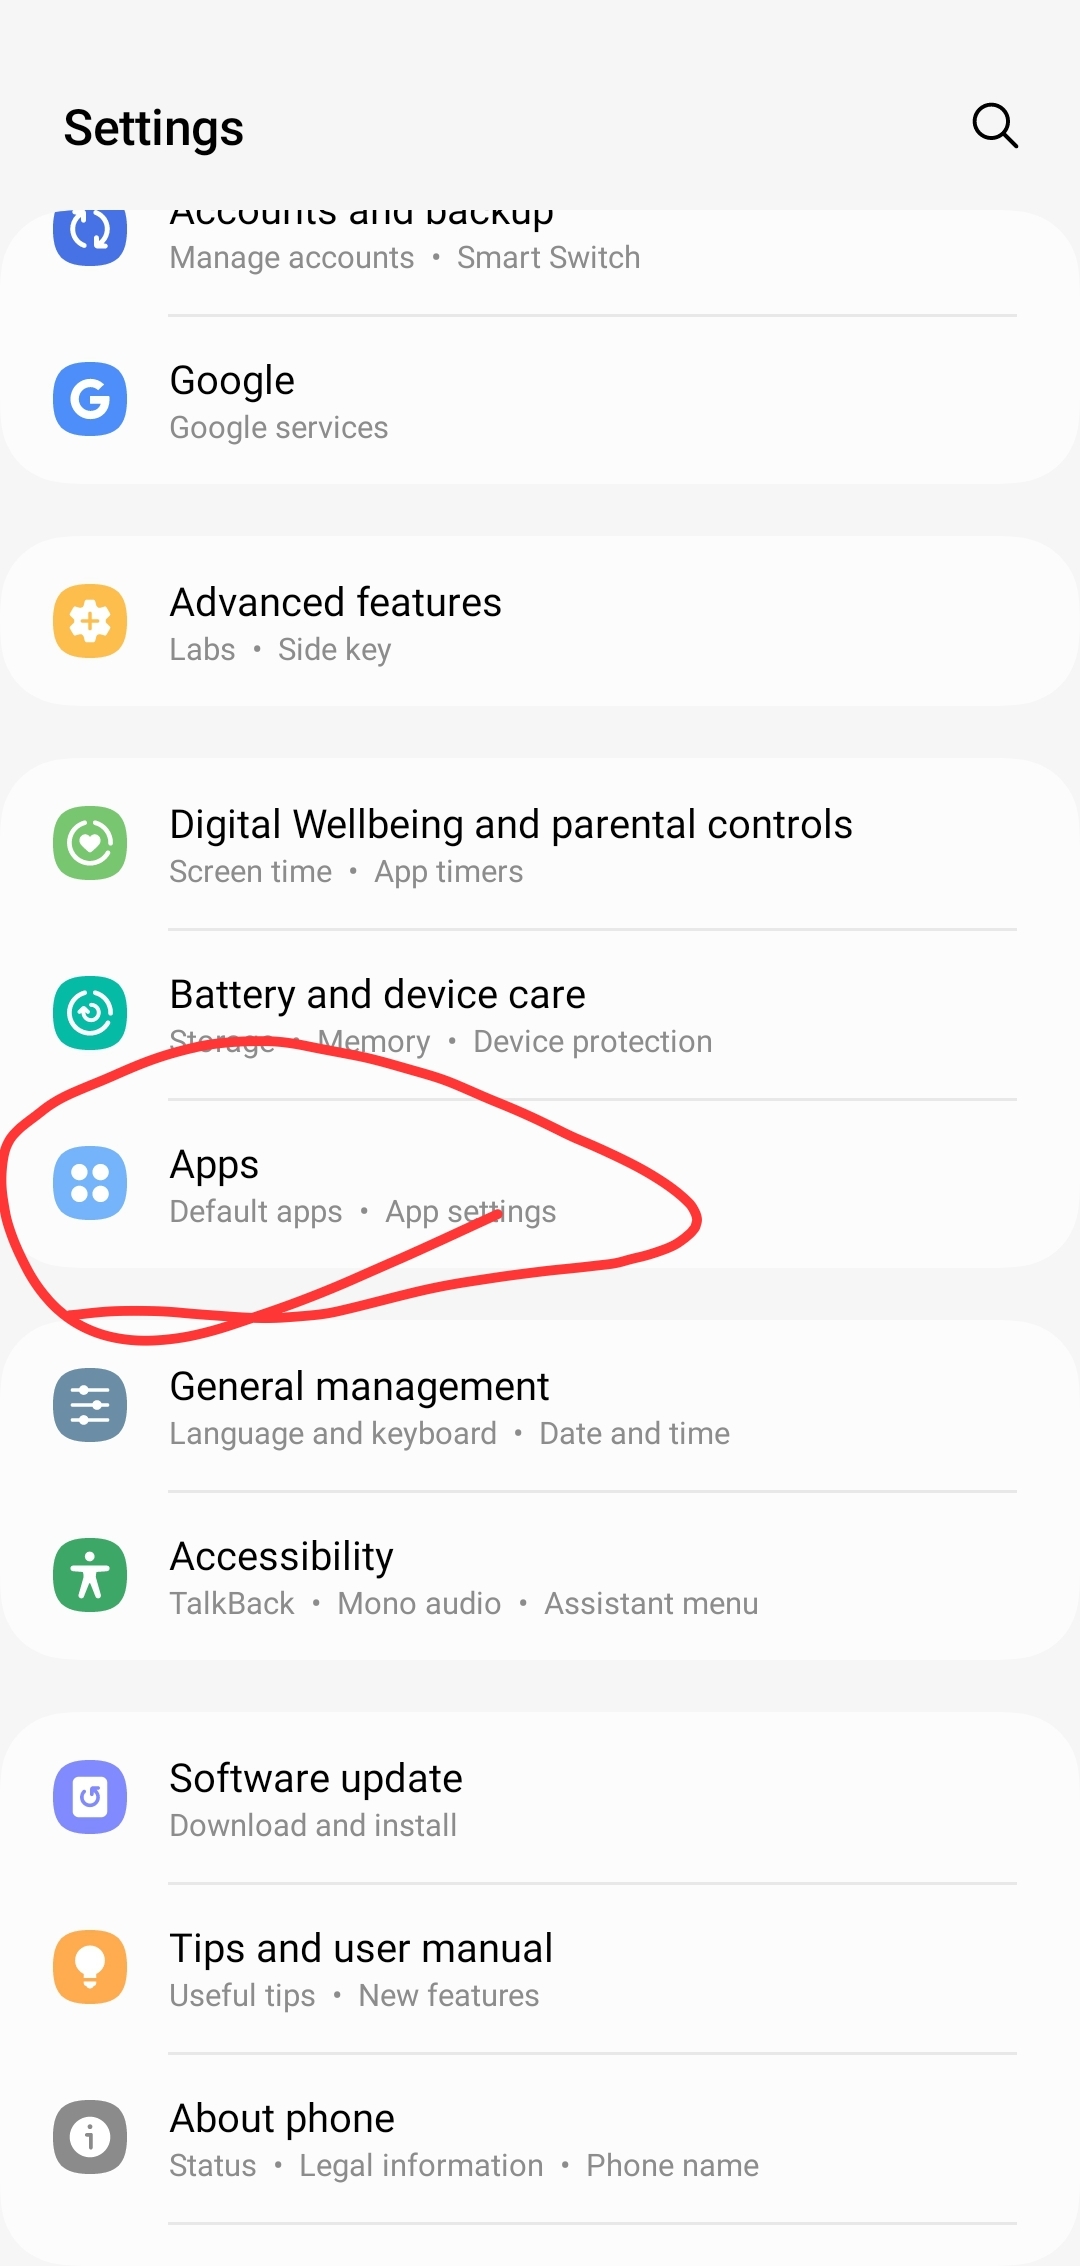
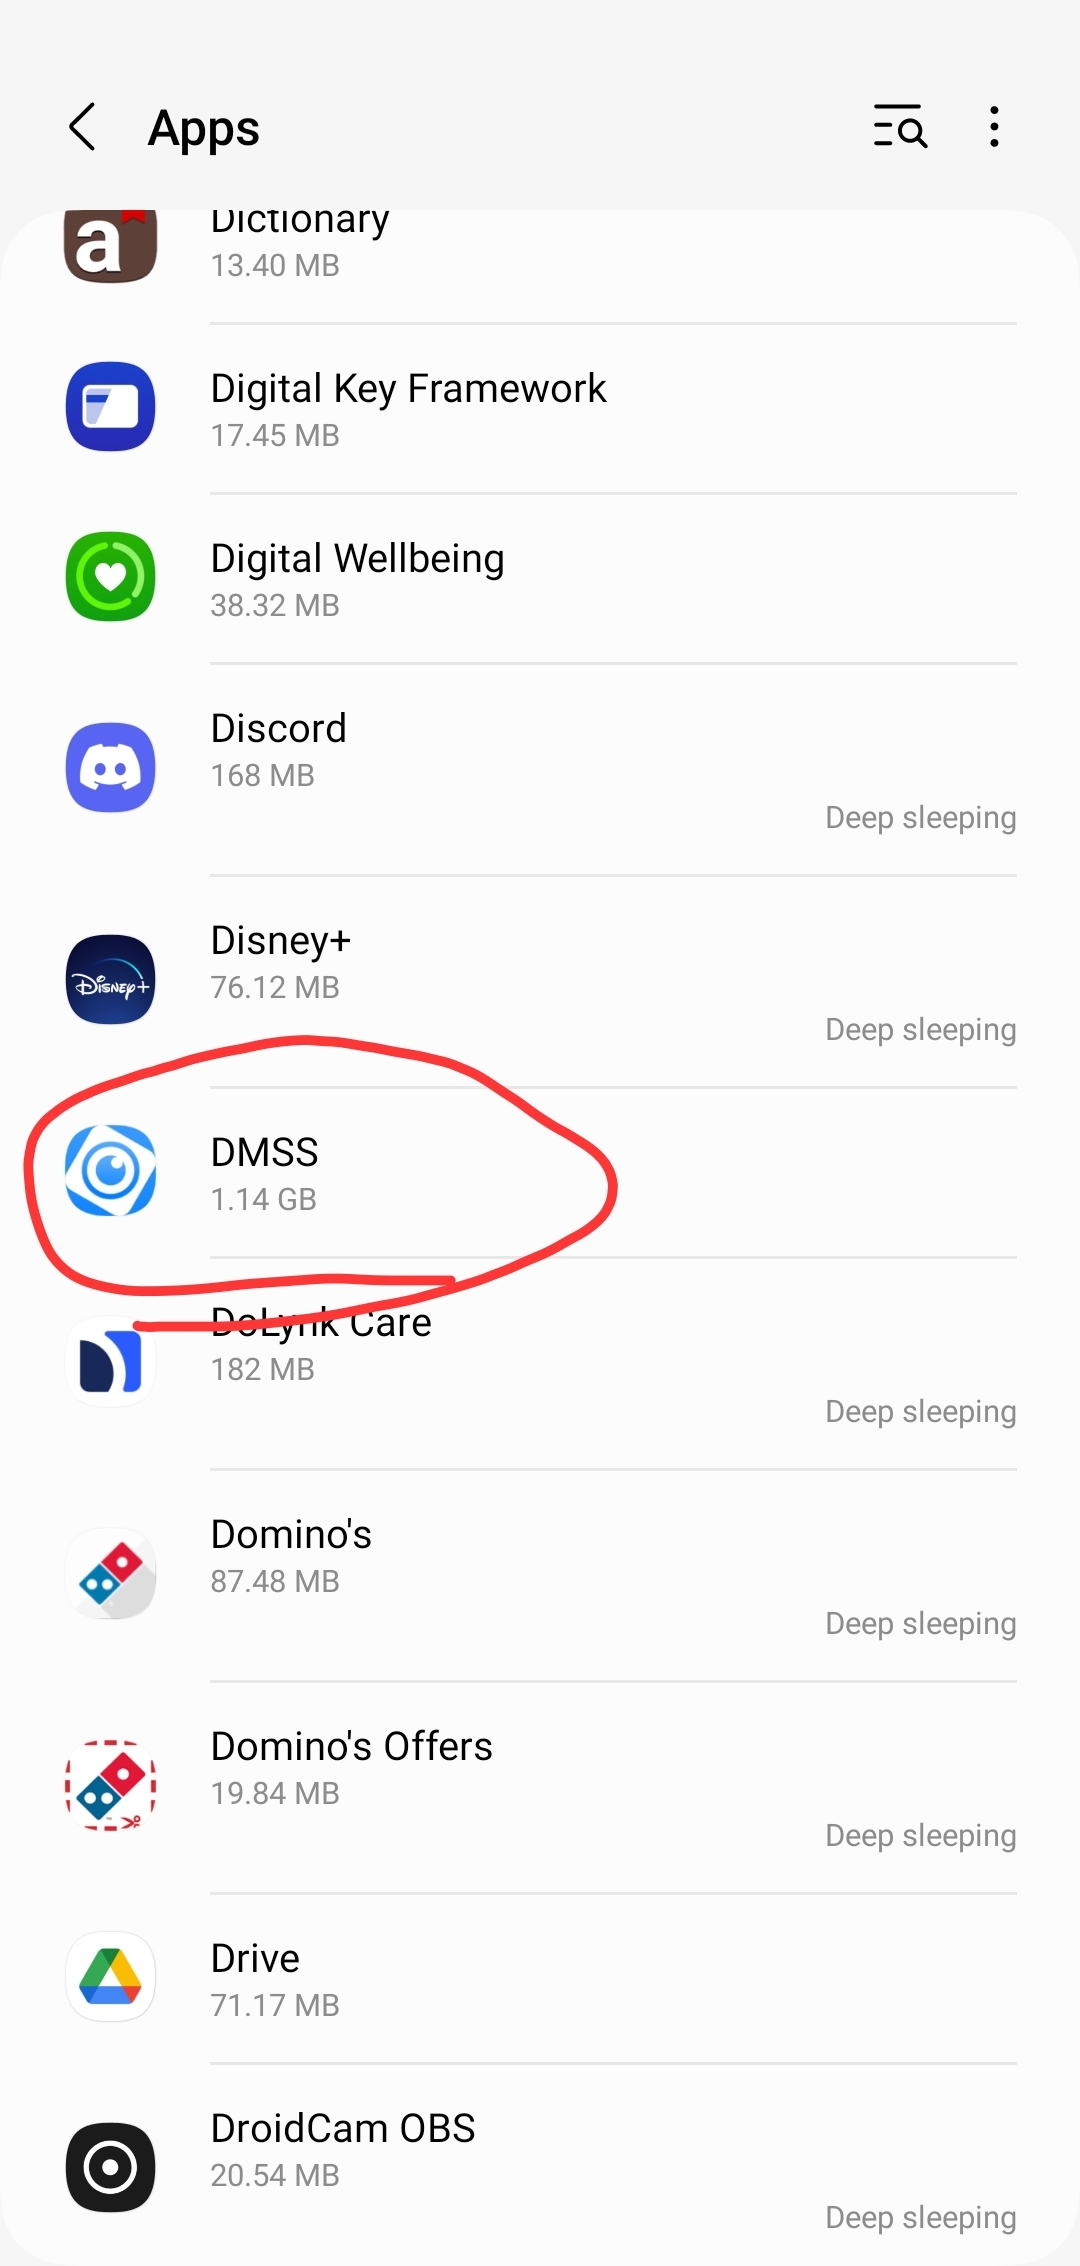
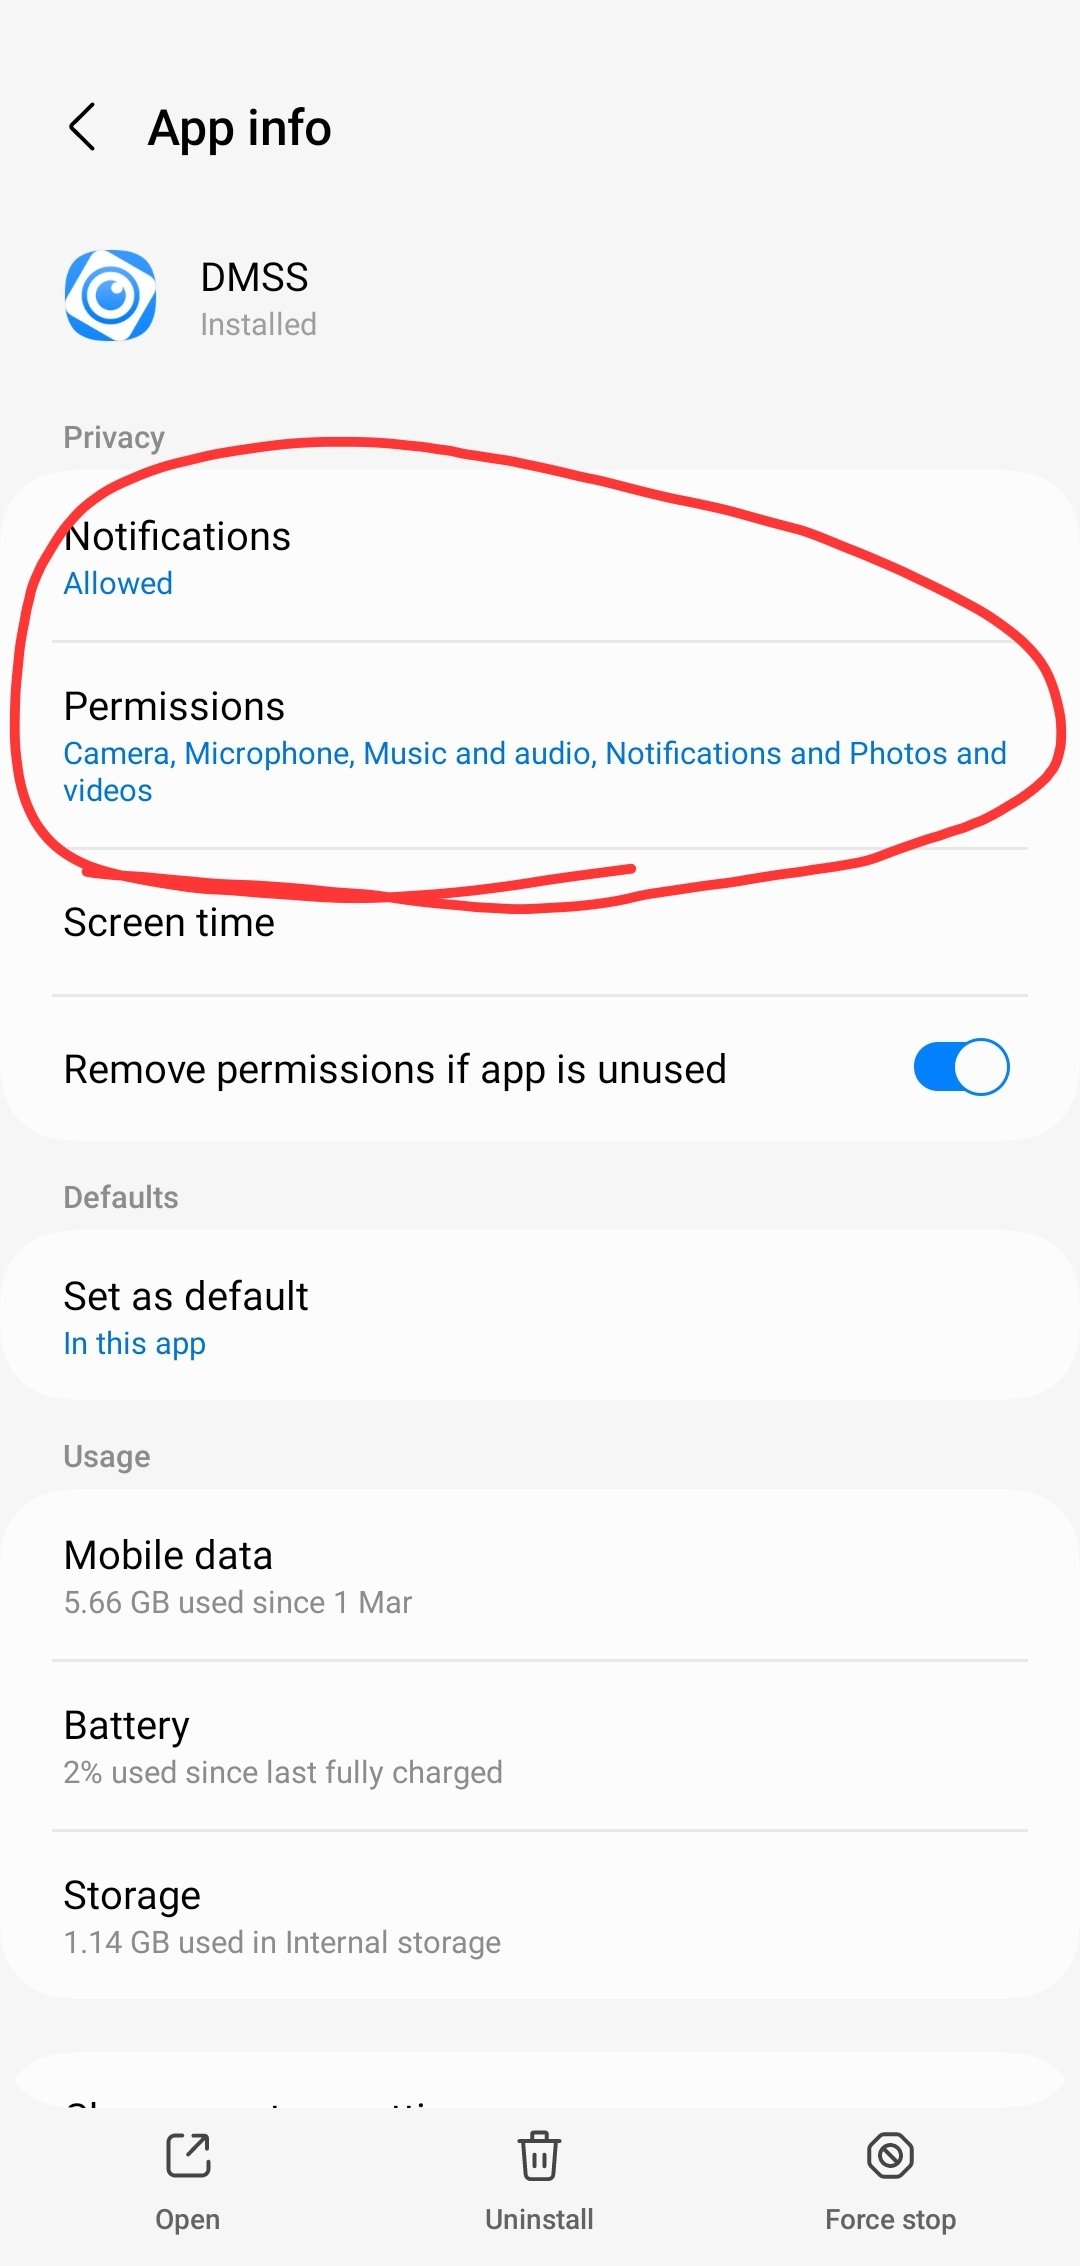
For Android: Navigate to Settings > Apps > scroll down to DMSS > Notifications > ensure they are allowed.
2. Update the app: Make sure that you’re using the latest version of the DMSS app.
3. Toggle the app’s notifications:
a. Open the DMSS app and click on the three dots to open the menu. Select “Device Details”.
b. Navigate to “Multi-channel Alarm Subscription”. Here, turn off the notifications using the slider button and remember to save your changes.
c. Restart your phone.
d. After the restart, go back to “Multi-channel Alarm Subscription”, turn on the notifications using the slider button, select “Intrusion Alarm”, then select “All”. Remember to save your changes.
4. Reinstall the app: If the previous steps didn’t work:
a. Unsubscribe from notifications in the DMSS app, then delete the app.
b. Restart your phone, modem, and NVR in that sequence.
c. Wait until all devices have fully booted up.
d. Download and install the DMSS app again, add your device to the app, and enable notifications.
App Displaying “Offline” or “Connection Failed”
Please note: as long as the NVR (Network Video Recorder) is powered, all recorded data will be accessible when the app regains its online status.
The following steps can help you restore the app’s connection:
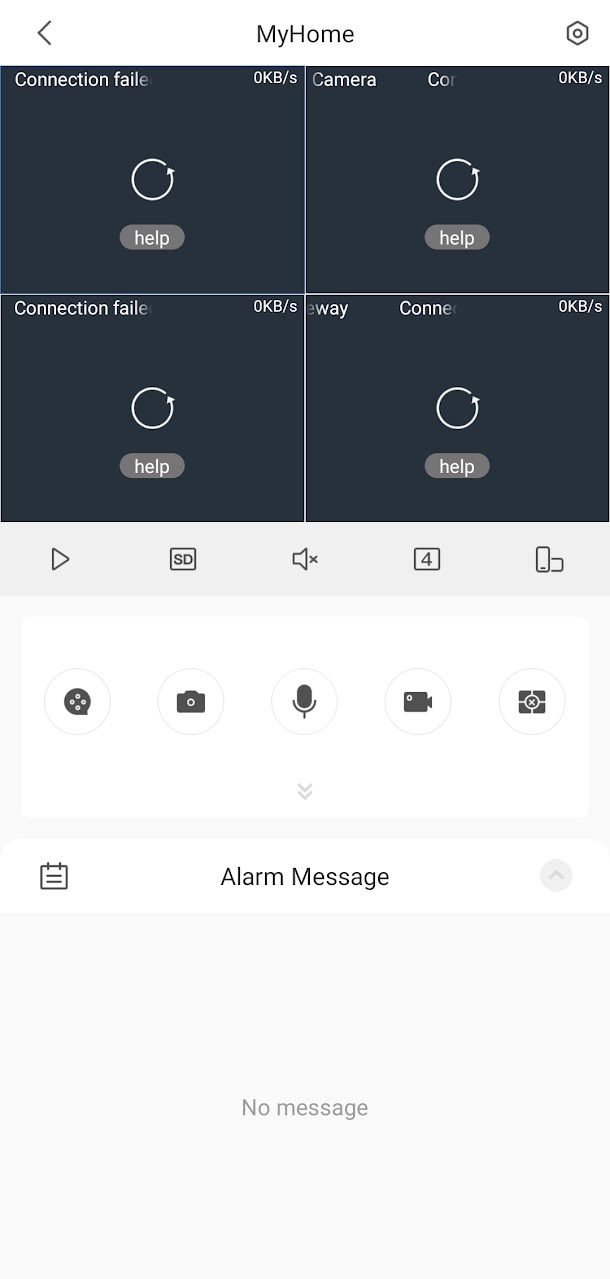
1. **Close and reopen the app.** Occasionally, the app may experience issues when switching between Wi-Fi and mobile data. If this step doesn’t resolve the issue, please proceed to the next steps.
2. **Reboot your equipment:**
a. **Modem**
b. **NVR (Network Video Recorder)**
c. **TP-Link 850RE – Device with white casing and blue lights** (only if you have one)
3. **Allow 10 minutes for all devices to fully restart.** This is crucial to ensure that all systems are ready to reestablish their connections.
4. **Try to view the cameras again through the app.**
NVR is Beeping
The beeping sound from your NVR could indicate a dead hard drive. Here’s what you can do:
1. **Restart the NVR**: Give your NVR a complete restart.
2. **Check for playback footage**: If you cannot playback footage, this is also an indicator of a potentially dead hard drive.
If the beeping continues after the restart and there’s no playback, please get in touch with us. We can assist with troubleshooting and, if necessary, the replacement of the hard drive.
App Displaying “Offline” or “Connection Failed” After Getting a New Modem
If you’ve recently changed your modem and now the app is displaying ‘offline’ or ‘connection failed’, follow these steps:
1. **Check the Connection for a Hardwired System**: If your system is hardwired, ensure that the NVR (Network Video Recorder) is connected to a LAN port on your modem, not a WAN port. If the system remains offline, try restarting your modem, NVR, and mobile phone.
2. **Re-pair for a Wi-Fi Connected System**: If your system is connected to the modem via Wi-Fi, you need to re-pair the Wi-Fi extender (the white box with blue lights) with your new modem.
a. **Initiate Pairing**: Press the button on the white box with blue lights. Then, proceed to your modem and press the WPS or PAIR button until it indicates it’s attempting to sync (usually shown by a flashing light).
b. **Confirm Reconnection**: Once it’s reconnected, you should observe more lights lit up on the white box with blue lights.
c. **Reboot the NVR if Necessary**: If the app does not come back online, it may be necessary to restart the NVR. After doing so, wait for 5-10 minutes for the NVR to boot back up, then refresh the app as previously explained.
Tutorial videos are available for popular service providers and modems on our YouTube Channel.
Additional support can be found on the manufacturers page here.
Login Details for the NVR
If you need to retrieve the login details for your Network Video Recorder (NVR), follow these steps:
1. **Default Login Details**: The NVR is typically configured with the following default login credentials:
Username: “admin”
Password: “Hifiguy123!!”
Please remember, both the username and password are case sensitive.
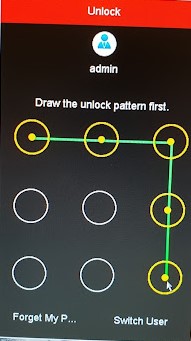
2. **Unlock Pattern**: An unlock pattern is set as an upside-down L. Refer to the provided image for a visual guide of the pattern.
One of the Cameras is Offline
If one of your cameras is displaying as ‘offline’, follow these steps:
1. **Reboot the NVR**: Give your NVR a complete restart. Please note that it will take approximately 5-10 minutes to boot back up.
2. **Refresh the App**: Once your NVR is back online, refresh the app.
Manual
If you need a copy of the manual for your NVR, follow these steps:
1. **Download the Manual**: The manual can be downloaded using the following link. Please note that the manual covers a few different models of NVR, and modifying settings from our initial installation may cause issues.
If you require further assistance please email us here.
Our Accreditations


Why Choose Us

15+ Years of Experience
There is no problem we can’t solve

Fixed pricing structure
No hidden costs, no extra changing

Fully Licensed
ACMA & Police Security Licensed Agent and Installer

Easy booking & install
We customise a security system on the day of installation

Fast Free Quotes
We provide fast & accurate quotes, with no hidden costs

Trusted Dahua Seller
The largest seller of Dahua products in WA

